Tampilkan postingan dengan label activity. Tampilkan semua postingan

How to create a full screen activity in Android

Posted by Unknown Selasa, 12 November 2013 0 komentar
In this tutorial we are going to learn how to create a full screen Activity..
Copy and download the code and try yourself..
 
import android.os.Bundle;
import android.view.Window;
import android.view.WindowManager;
import android.app.Activity;


public class FullscreenActivities extends Activity {

@Override
protected void onCreate(Bundle savedInstanceState) {
super.onCreate(savedInstanceState);

//removes the unwanted contents.....
requestWindowFeature(Window.FEATURE_NO_TITLE);
getWindow().setFlags(WindowManager.LayoutParams.FLAG_FULLSCREEN, WindowManager.LayoutParams.FLAG_FULLSCREEN);
//......................

setContentView(R.layout.activity_fullscreen_activities);


Baca Selengkapnya ....

What is the difference between Services, Thread and an AsyncTask in Android?

Posted by Unknown Senin, 21 Oktober 2013 0 komentar
Thread Example n ANDROID -- Timer Thread Example
Non Runnable States in Multithreading - Different states while thread is in runnable states
What is a thread in java ?
How to write interfaces in java or Android?
More on Android ?

Service is like an Activity but has no interface. Probably if you want to fetch the weather for example you won’t create a blank activity for it, for this you will use a Service.

A Thread is a Thread, probably you already know it from other part. You need to know that you cannot update UI from a Thread. You need to use a Handler for this, but read further.

An AsyncTask is an intelligent Thread that is advised to be used. Intelligent as it can help with it’s methods, and there are two methods that run on UI thread, which is good to update UI components.

Baca Selengkapnya ....

Customized Spinners in Android

Posted by Unknown Rabu, 24 April 2013 0 komentar

See more basics on Android along with interview questions

The Android Spinner Control is definitely the equivalent of the drop-down selector . By making use of spinner control you basically obtain the capability to choose from a list without taking up all of the display screen space of a ListView.

Spinners provide a quick way to select one value from a set. In the default state, a spinner shows its currently selected value. Touching the spinner displays a dropdown menu with all other available values, from which the user can select a new one.

You can add a spinner to your layout with the Spinner object. You should usually do so in your xml layout with a  <spinner>  element. For example:
 <Spinner
    android:id="@+id/myspinner"
    android:layout_width="fill_parent"
    android:layout_height="wrap_content" />

Here we are going to deal with Customized Spinners.Here we go with java code samples.

in java file:
public class Custom_spinner extends Activity {
String[] data1 = { "Java", "Android","Blackberry", "Apple", "Windows" };

String[] data2 = { "Developed by Sun Microsystems", "Android is a Linux-based operating system",
"Designed and marketed by Research In Motion Limited ","Designed and marketed by Apple Inc"
,"developed, marketed, and sold by Microsoft."};

Integer[] images = { R.drawable.java, R.drawable.android,
R.drawable.blackberry, R.drawable.apple, R.drawable.windows };

/** Called when the activity is first created. */
@Override
public void onCreate(Bundle savedInstanceState) {
super.onCreate(savedInstanceState);
setContentView(R.layout.custom_spinner);
Spinner mySpinner = (Spinner) findViewById(R.id.spinner1);
mySpinner.setAdapter(new MyAdapter(this, R.layout.cus_row, data1));
}

public class MyAdapter extends ArrayAdapter<String> {

public MyAdapter(Context context, int textViewResourceId,
String[] objects) {
super(context, textViewResourceId, objects);
// TODO Auto-generated constructor stub
}

@Override
public View getDropDownView(int position, View convertView,
ViewGroup parent) {
return getCustomView(position, convertView, parent);
}

@Override
public View getView(int position, View convertView, ViewGroup parent) {
return getCustomView(position, convertView, parent);
}

public View getCustomView(int position, View convertView,
ViewGroup parent) {

LayoutInflater inflater = getLayoutInflater();//inflate xml for each row
View row = inflater.inflate(R.layout.cus_row, parent, false);
TextView label = (TextView) row.findViewById(R.id.textView1);
label.setText(data1[position]);

TextView sub = (TextView) row.findViewById(R.id.textView2);
sub.setText(data2[position]);

ImageView icon = (ImageView) row.findViewById(R.id.imageView1);
icon.setImageResource(images[position]);

return row;
} }}

in custom_spinner.xml (main xml file) :
<RelativeLayout xmlns:android="http://schemas.android.com/apk/res/android"
xmlns:tools="http://schemas.android.com/tools"
android:layout_width="match_parent"
android:layout_height="match_parent"
android:padding="10dp" >
<Spinner

android:id="@+id/spinner1"
android:layout_width="match_parent"
android:layout_height="wrap_content"
android:drawSelectorOnTop="true"
android:background="@drawable/purple"
>
</Spinner>
</RelativeLayout>
in cus_row.xml (inflated xml file) :
<?xml version="1.0" encoding="utf-8"?>
<RelativeLayout xmlns:android="http://schemas.android.com/apk/res/android"
android:id="@+id/relativeLayout1"
android:layout_width="match_parent"
android:layout_height="wrap_content"
android:padding="3dip" >

<LinearLayout
android:layout_width="wrap_content"
android:layout_height="wrap_content"
android:orientation="horizontal" >

<ImageView
android:id="@+id/imageView1"
android:layout_width="wrap_content"
android:layout_height="wrap_content"
android:src="@drawable/ic_launcher" >
</ImageView>
</LinearLayout>

<LinearLayout
android:layout_width="wrap_content"
android:layout_height="wrap_content"
android:orientation="vertical"
android:paddingLeft="70dp" >

<TextView
android:id="@+id/textView1"
android:layout_width="wrap_content"
android:layout_height="wrap_content"
android:textStyle="bold" >
</TextView>

<TextView
android:id="@+id/textView2"
android:layout_width="wrap_content"
android:layout_height="wrap_content" >
</TextView>
</LinearLayout>

</RelativeLayout>
@drawable/purple.xml :


Baca Selengkapnya ....

BroadcastReceiver for Screen On/Off in ANDROID

Posted by Unknown Senin, 22 April 2013 0 komentar
If wanted to call a broadcast for screen on/off you can get the code sniffet from here.
Here I have used dynamic calling of Broadcast and the java source code is given below.

get more details about broadcast from :
in java file:
 
public class MainActivity extends Activity {
//Create broadcast object
BroadcastReceiver mybroadcast = new BroadcastReceiver() {

//When Event is published, onReceive method is called
@Override
public void onReceive(Context context, Intent intent) {
// TODO Auto-generated method stub
Log.i("[BroadcastReceiver]", "MyReceiver");

if(intent.getAction().equals(Intent.ACTION_SCREEN_ON)){
Log.i("[BroadcastReceiver]", "Screen ON");
}
else if(intent.getAction().equals(Intent.ACTION_SCREEN_OFF)){
Log.i("[BroadcastReceiver]", "Screen OFF");
}
}};

@Override
public void onCreate(Bundle savedInstanceState) {
super.onCreate(savedInstanceState);
setContentView(R.layout.activity_main);

registerReceiver(mybroadcast, new IntentFilter(Intent.ACTION_SCREEN_ON));
registerReceiver(mybroadcast, new IntentFilter(Intent.ACTION_SCREEN_OFF));
}
}

Baca Selengkapnya ....

BroadcastReceiver to get Battery Level - simple Example using dynamic calling of BroadCast in ANDROID

Posted by Unknown Senin, 08 April 2013 0 komentar
See Introduction for Broadcast Receiver here:

 When you need to call a broadcast (suppose here battery value) you need to register the broadcast and when the event is published it will call onReceive method which have context and particular intent as parameter.

 
public class Broadcast extends Activity {
//Create broadcast object
BroadcastReceiver mybroadcast = new BroadcastReceiver() {

//When Event is published, onReceive method is called
@Override
public void onReceive(Context context, Intent intent) {
//Get battery percentage
int batterylevel = intent.getIntExtra("level", 0);
//get progressbar
ProgressBar myprogressbar = (ProgressBar) findViewById(R.id.progressbar);
myprogressbar.setProgress(batterylevel);
TextView tv = (TextView) findViewById(R.id.textfield);
//Set TextView with text
tv.setText("Battery Level: " + Integer.toString(batterylevel) + "%");
}
};

@Override
public void onCreate(Bundle savedInstanceState) {
super.onCreate(savedInstanceState);
setContentView(R.layout.activity_broadcast);
registerReceiver(mybroadcast, new IntentFilter(Intent.ACTION_BATTERY_CHANGED));
}
}
The arguments of the registerReceiver() method
receiver :: The BroadcastReceiver you want to register
filter :: The IntentFilter object that specifies which event your receiver should listen to.

To learn more on event and usages click here...

Baca Selengkapnya ....

How to Open Calculator In ANDROID

Posted by Unknown Rabu, 03 April 2013 0 komentar
If we want to open the inbuilt calculator of ANDROID ,here is the sniffet...
 
public class CalculatorActivity extends Activity {
public static final String CALCULATOR_PACKAGE ="com.android.calculator2";
public static final String CALCULATOR_CLASS ="com.android.calculator2.Calculator";
@Override
public void onCreate(Bundle savedInstanceState) {
super.onCreate(savedInstanceState);
setContentView(R.layout.activity_main);

Intent calculatorintent = new Intent();

calculatorintent.setAction(Intent.ACTION_MAIN);
calculatorintent.addCategory(Intent.CATEGORY_LAUNCHER);
calculatorintent.setComponent(new ComponentName(CALCULATOR_PACKAGE,CALCULATOR_CLASS));

CalculatorActivity.this.startActivity(calculatorintent);
} }
The above may not work with every devices, so you may need this one..
 
ArrayList<HashMap<String,Object>> items =new ArrayList<HashMap<String,Object>>();
PackageManager pm;
final PackageManager p = getPackageManager();
List<PackageInfo> packs = p.getInstalledPackages(0);
for (PackageInfo pi : packs) {
if( pi.packageName.toString().toLowerCase().contains("calcul")){
HashMap<String, Object> map = new HashMap<String, Object>();
map.put("appName", pi.applicationInfo.loadLabel(p));
map.put("packageName", pi.packageName);
items.add(map);
}
}
if(items.size()>=1){
String packageName = (String) items.get(0).get("packageName");
Intent i = p.getLaunchIntentForPackage(packageName);
if (i != null)
startActivity(i);
}
else{
// Application not found
}

Baca Selengkapnya ....

View Flipper with Animationin ANDROID

Posted by Unknown Selasa, 19 Maret 2013 0 komentar
Suppose you have to show an item for few minutes and then flips to next one we can use viewflipper. ViewFlipper inherits from frame layout, so it displays a single view at a time. in java class:
   ViewFlipper vflip;
vflip=(ViewFlipper) findViewById(R.id.viewFlipper1);
//when a view is displayed
vflip.setInAnimation(this,android.R.anim.fade_in);
//when a view disappears
vflip.setOutAnimation(this, android.R.anim.fade_out);
vflip.setFlipInterval(500);
vflip.startFlipping();//starts flippin
// vflip.stopFlipping();//stops flipping
in xml
<RelativeLayout xmlns:android="http://schemas.android.com/apk/res/android"
xmlns:tools="http://schemas.android.com/tools"
android:layout_width="match_parent"
android:layout_height="match_parent" >

<ViewFlipper
android:id="@+id/viewFlipper1"
android:layout_width="wrap_content"
android:layout_height="fill_parent"
android:layout_alignParentTop="true"
android:layout_marginRight="16dp"
android:layout_marginTop="85dp"
android:layout_toLeftOf="@+id/textView1" >

<ImageView
android:id="@+id/imageView1"
android:layout_width="wrap_content"
android:layout_height="wrap_content"
android:src="@drawable/images1" />

<ImageView
android:id="@+id/imageView2"
android:layout_width="wrap_content"
android:layout_height="wrap_content"
android:src="@drawable/images2" />

<ImageView
android:id="@+id/imageView3"
android:layout_width="wrap_content"
android:layout_height="wrap_content"
android:src="@drawable/images3" />

<ImageView
android:id="@+id/imageView4"
android:layout_width="wrap_content"
android:layout_height="wrap_content"
android:src="@drawable/images4" />

</ViewFlipper>
</RelativeLayout>
Here the view changes for every 500 millisecond.same way we can even provide layouts inside it.

Baca Selengkapnya ....

ListView in Alphabetic Order in ANDROID

Posted by Unknown Jumat, 01 Maret 2013 0 komentar
Java class: 
public class MainActivity extends ListActivity {
static final String[] items = new String[] { "Babbage","Boole", "Berners-Lee",
"Atanasoff", "Allen","Cormack", "Cray","Dijkstra","Dix","Dewey",
"Erdos","Zebra" };

ArrayAdapter<string> arrayadapter;
ListView listview;
ArrayList<string> arraylist;
@Override
public void onCreate(Bundle savedInstanceState) {
super.onCreate(savedInstanceState);
setContentView(R.layout.activity_main);
arraylist= new ArrayList<String>();
for(int i=0;i<items.length;i++)
{
arraylist.add(FRUITS[i]);
}
Collections.sort(arraylist );//for sorting arraylist
arrayadapter=new ArrayAdapter<String>(this,android.R.layout.simple_list_item_1,arraylist);
listview=getListView();
listview.setAdapter(arrayadapter);
listview.setOnItemClickListener(new OnItemClickListener() {
public void onItemClick(AdapterView parent,View view,
int position, long id)
{
Toast.makeText(getApplicationContext(),
((TextView) view).getText(), Toast.LENGTH_SHORT).show();
}});}}
                 

Baca Selengkapnya ....

Activity Life Cycle of Android

Posted by Unknown 0 komentar
An activity is usually a single screen that the user sees on the device at one time. An application typically has multiple activities, and the user flips back and forth among them. As such, activities are the most visible part of your application.Activity Manager is responsible for creating, destroying, and managing activities. For example, when the user starts an application for the first time, the Activity Manager will create its activity and put it onto the screen. Later, when the user switches screens, the Activity Manager will move that previous activity to a holding place. This way, if the user wants to go back to an older activity, it can be started more quickly. Older activities that the user hasn’t used in a while will be destroyed in order to free more space for the currently active one. This mechanism is designed to help improve the speed of the user interface and thus improve the overall user experience.

An Activity in Android can exist in four states as described below:
1.  Active/Running state
This is a state when an activity is in the front and has focus in it. It is completely visible and active to the user.
2. Paused state
In paused state, the activity is partially visible to the user but not active and lost focus. This occurs when some another Activity is on top of this one which doesnot cover the entire screen or having some transparancy so that the underlying Activity is partially visible. A paused activity is completely alive and maintains its state but it can be killed by system under low memory when memory can be freed by no other ways.
3.  Stopped state
This is when the Activity is no longer visible in the screen. Another activity is on top of it and completely obscures its view. In this state also the activity is alive and preserves its state, but more likely to be killed by the system to free resources whenever necessary
4. Destroyed/Dead state
An Activity is said to be dead or destroyed when it no longer exists in the memory. Either the Activity hasn’t been started yet or once it was started and killed by the system in Paused or Stopped state to free resources.

  • When we launch an Activity in Android, it first calls the onCreate() method. This is where we do User Interface creation and initialization of data elements. This method is provided with a Bundle object as parameter to restore the UI state.
  • onStart() method is called before the Activity is being visible to the User. Remember that Activity is still not Active.
  • With the onResume() method, the Activity become visible and Active for the user to interact with. The Activity will be at the top of the Activity stack at this point. Now the Activity is in running /active state and is able to receive user inputs.
  • In the Active state, onPause() method will be called when the system is about to resume another Activity on top of this one or when the user is about to navigate to some other other parts of the system. It is the last guaranteed call to a method before the Activity  can get killed by the system. That is, there’s a possibility that your activity may be killed by the system at the paused state without executing any further method calls. Therefore it is important to save the user interface configuration and critical data at this method.
  • By default, an Activity can remain in the paused state if:
  • The user has pressed the home button
  • Another activity or notification which is on top of it doesn’t completely obscures the visibility of underlying Activity.
  • The device goes to sleep.
  • There are three possibilities for an Activity under paused state:
  1. The user resumes the Activity by closing the new Activity or notification and the paused Activity gets Active/Running by calling onResume() method.
  2. It gets killed by the system under extremely low memory conditions. In this case there will be no further method calls before the destruction of the Activity and it needs to be re-run from the beginning by calling onCreate() and restoring the previous configuration from bundle object.
In all other cases it goes to stopped state by executing onStop() method. This is the default action when the user has pressed the back button, or a new activity which completely covers it resumes on top.
  • An Activity under stopped state also has three different scenarios to happen:
  1. System kills it to free resources. An activity under stopped sate is more likely to be killed by the system than one in the paused state. It needs to start the cycle again with onCreate().
  2. It get restarted by calling onRestart() , onStart() and onResume() methods in the order if the user navigates back to the Activity again. In this case, the User Interface is intact and no need to be restored.
  3. onDestroy() method is called and the Activity is destroyed. This is the final method we can call before the Activity is destroyed. This occurs either because the Activity is finishing the operation or the system is temporarily destroying it to save space.

Android Activity Lifecycle Loops

By analyzing the Android Activity lifecycle diagram we can see there are three lifecycle loops exist for every Activity and are defined by those callback methods.
They are:
Entire Lifetime: This is the lifetime between the first call to the onCreate() and the final call to onDestroy() method. We create all global resources such as screen layout, global variables etc in onCreate() and release all resources with onDestroy() call.
Visible Lifetime:  It is the lifetime of an Activity between onStart() and onStop() method calls. In this the Activity is visible to the user and he may or may not be able to interact with it. During the visible lifetime, an Activity maintains its state intact.
Foreground Lifetime:  Foreground lifetime starts with onResume() and ends with onPause() method calls. During this, the Activity is completely visible to the user and is on top of all other Activities so that user can interact with it.


Baca Selengkapnya ....

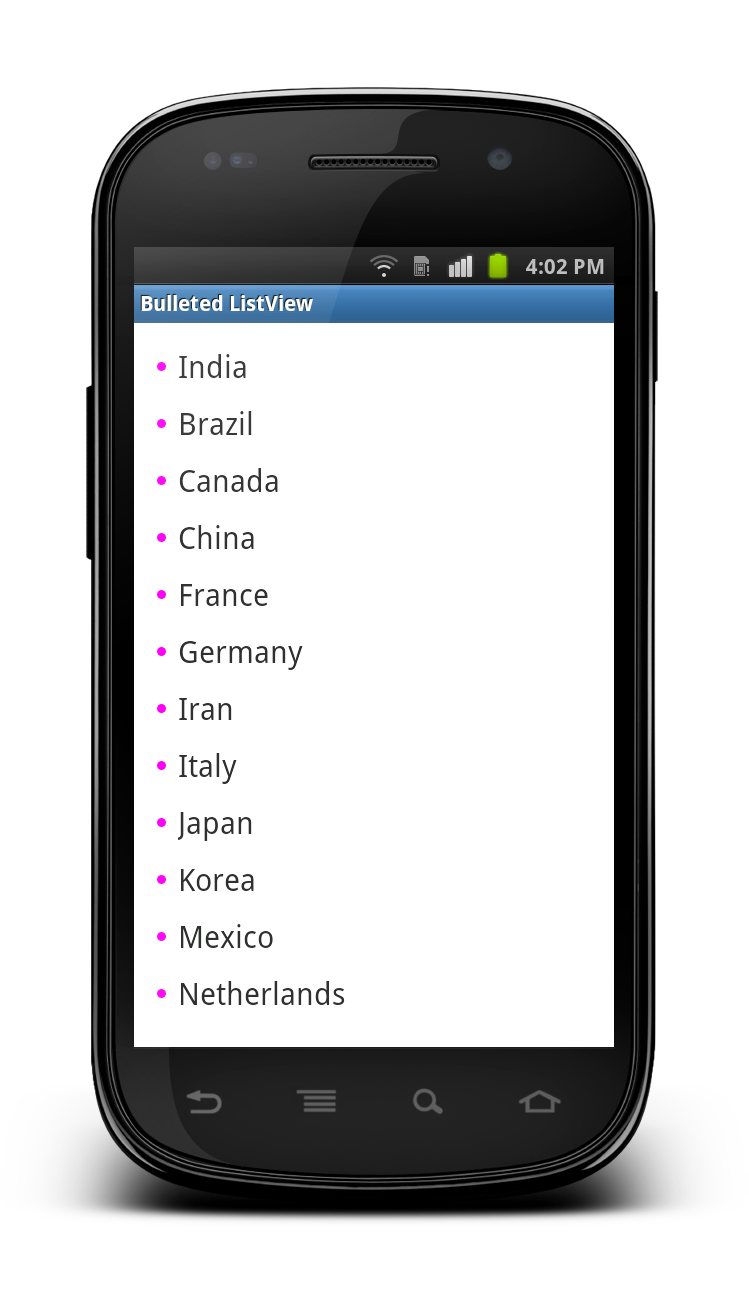
Android – Bullets in ListView

Posted by Unknown Senin, 18 Februari 2013 0 komentar
main.xml :
<?xml version="1.0" encoding="utf-8"?> 
<LinearLayout
xmlns:android="http://schemas.android.com/apk/res/android"
android:layout_width="fill_parent"
android:layout_height="fill_parent"
android:orientation="vertical"
android:padding="10dp">

<ListView
android:id="@+id/listView"
android:layout_width="fill_parent"
android:layout_height="wrap_content"
android:listSelector="@android:color/transparent"
android:divider="@null"/>
</LinearLayout>
create a bullet.xml in drawable folder:
<?xml version="1.0" encoding="utf-8"?> 
<shape xmlns:android="http://schemas.android.com/apk/res/android"
android:shape="oval">
<size
android:height="6dp"
android:width="6dp"/>
<solid android:color="#FF00F0"/>
</shape>
list_item.xml for creating custom listview:
<?xml version="1.0" encoding="utf-8"?> 
<TextView xmlns:android="http://schemas.android.com/apk/res/android"
android:id="@+id/itemText"
android:layout_width="wrap_content"
android:layout_height="wrap_content"
android:drawableLeft="@drawable/bullet"
android:drawablePadding="8dp"
android:padding="5dp"
android:text="List Item"
android:textSize="20sp"/>
BulletListViewActivity.java
public class BulletedListViewActivity extends Activity {
/** Called when the activity is first created. */
ArrayList<string> listCountry;
@Override
public void onCreate(Bundle savedInstanceState) {
super.onCreate(savedInstanceState);
setContentView(R.layout.main);
prepareList();
ListView listView = (ListView)findViewById(R.id.listView);
listView.setAdapter(new ArrayAdapter<string>(
this, R.layout.list_item, listCountry));
}
public void prepareList()
{
listCountry = new ArrayList<string>();
listCountry.add("India");
listCountry.add("Brazil");
listCountry.add("Canada");
listCountry.add("China");
listCountry.add("France");
listCountry.add("Germany");
listCountry.add("Iran");
listCountry.add("Italy");
listCountry.add("Japan");
listCountry.add("Korea");
listCountry.add("Mexico");
listCountry.add("Netherlands");
listCountry.add("Portugal");
listCountry.add("Russia");
listCountry.add("Saudi Arabia");
listCountry.add("Spain");
listCountry.add("Turkey");
listCountry.add("United Kingdom");
listCountry.add("United States");
}}


Baca Selengkapnya ....

How to write interfaces in java or Android?

Posted by Unknown 0 komentar
what is an Interface?
An interface is a collection of abstract methods. A class implements an interface, thereby inheriting the abstract methods of the interface.
An interface is not a class. Writing an interface is similar to writing a class, but they are two different concepts. A class describes the attributes and behaviors of an object. An interface contains behaviors that a class implements.
Unless the class that implements the interface is abstract, all the methods of the interface need to be defined in the class.

MainActivity.java
public class MainActivity extends Activity implements Interface {
@Override
protected void onCreate(Bundle savedInstanceState) {
super.onCreate(savedInstanceState);
setContentView(R.layout.activity_main);
}
@Override
public void testFunctionOne() {
System.out.println("Print from testFunctionOne in the Interface");
}
@Override
public void testFunctionTwo() {
System.out.println("Print from testFunctionTwo in the Interface");
}}
in Interface.java
public interface Interface  {    
void testFunctionOne();
void testFunctionTwo(); }

Baca Selengkapnya ....

Fragmentation In Android

Posted by Unknown Minggu, 17 Februari 2013 0 komentar

See more basics on Android along with interview questions

Fragments are a portion of an Activity:
Load a fragment Activity to call a fragment :
public class MainActivity extends FragmentActivity {
@Override
protected void onCreate(Bundle savedInstanceState) {
super.onCreate(savedInstanceState);
setContentView(R.layout.activity_main);
} }
activity_main :
<LinearLayout xmlns:android="http://schemas.android.com/apk/res/android"
android:layout_width="match_parent"
android:layout_height="match_parent"
android:orientation="horizontal">
<fragment
android:id="@+id/titles"
android:layout_width="0px"
android:layout_height="match_parent"
android:layout_weight="1"
class="com.example.googlefragment.TitlesFragment"/>
//calls the fragment
</LinearLayout>
TitlesFragment :
public class TitlesFragment extends android.support.v4.app.ListFragment {
boolean mDualPane;
int mCurCheckPosition = 0;
String titles[] = { "Item one", "Item two", "Item three" };
@Override
public void onActivityCreated(Bundle savedInstanceState) {
super.onActivityCreated(savedInstanceState);
// Populate list with our static array of titles.setListAdapter(new ArrayAdapter(getActivity(),
android.R.layout.simple_dropdown_item_1line,titles));

// Check to see if we have a frame in which to embed the details
// fragment directly in the containing UI.
View detailsFrame = getActivity().findViewById(R.id.details);
mDualPane = detailsFrame != null && detailsFrame.getVisibility() == View.VISIBLE;
if (savedInstanceState != null) {
// Restore last state for checked position.
mCurCheckPosition = savedInstanceState.getInt("curChoice", 0);
}
if (mDualPane) {
// In dual-pane mode, the list view highlights the selected item.
getListView().setChoiceMode(ListView.CHOICE_MODE_SINGLE);
// Make sure our UI is in the correct state.
showDetails(mCurCheckPosition);
}else
{
System.out.println("NOT DUAL");
} }

@Override
public void onSaveInstanceState(Bundle outState) {
super.onSaveInstanceState(outState);
outState.putInt("curChoice", mCurCheckPosition);
}
@Override
public void onListItemClick(ListView l, View v,int position,long id) {
showDetails(position);
}
void showDetails(int index) {
mCurCheckPosition = index;
if (mDualPane) {
// We can display everything in-place with fragments,so update
// the list to highlight the selected item and show the data.
getListView().setItemChecked(index, true);
// Check what fragment is currently shown,replace if needed.
DetailsFragment details = (DetailsFragment)
getFragmentManager().findFragmentById(R.id.details);
if (details == null || details.getShownIndex()!=index) {
// Make new fragment to show this selection.
details = DetailsFragment.newInstance(index);
// Execute a transaction, replacing any existing fragment
// with this one inside the frame.
FragmentTransaction ft = getFragmentManager().beginTransaction();
ft.replace(R.id.details, details);
ft.setTransition(FragmentTransaction.TRANSIT_FRAGMENT_FADE);
ft.commit();
}
} else {
// Otherwise we need to launch a new activity to display
// the dialog fragment with selected text.
Intent intent = new Intent();
intent.setClass(getActivity(),DetailsActivity.class);
intent.putExtra("index", index);
startActivity(intent);
} }}
DetailsActivity :
public class DetailsActivity extends FragmentActivity {
@Override
protected void onCreate(Bundle savedInstanceState) {
super.onCreate(savedInstanceState);
if (getResources().getConfiguration().orientation == Configuration.ORIENTATION_LANDSCAPE) {
setContentView(R.layout.details_lay);
System.out.println("LANNNNNNNNNNN");
return;
}
if (savedInstanceState == null) {
System.out.println("LLLLLLLLLLL");
Fragment details = new DetailsFragment();
details.setArguments(getIntent().getExtras());
getSupportFragmentManager().beginTransaction()
.add(android.R.id.content, details).commit();

} } }
details_lay:
<LinearLayout xmlns:android="http://schemas.android.com/apk/res/android"
android:layout_width="match_parent"
android:layout_height="match_parent"
android:orientation="horizontal">
<LinearLayout
android:id="@+id/details"
android:layout_width="0px"
android:layout_height="match_parent"
android:layout_weight="1"
class="com.example.googlefragment.DetailsFragment"/>
</LinearLayout>
DetailsFragment :
public class DetailsFragment extends Fragment {
static int i = 0;
public static DetailsFragment newInstance(int index) {
DetailsFragment f = new DetailsFragment();
// Supply index input as an argument.
Bundle args = new Bundle();
args.putInt("index", index);
i = index;
f.setArguments(args);
return f;
}
public int getShownIndex() {
return getArguments().getInt("index", 0);
}
@Override
public View onCreateView(LayoutInflater inflater,ViewGroup container,Bundle savedInstanceState){
if (container == null) {
return null;
}
WebView wv = new WebView(getActivity());
wv.loadData("Hello " + i, "text/html", "utf-8");
return wv;
} }
NOTE: Put layout under two separate folder for layout and portrait.


Baca Selengkapnya ....

Spinners in Android

Posted by Unknown Kamis, 24 Januari 2013 0 komentar
The Android Spinner Control is definitely the equivalent of the drop-down selector . By making use of spinner control you basically obtain the capability to choose from a list without taking up all of the display screen space of a ListView.

Spinners provide a quick way to select one value from a set. In the default state, a spinner shows its currently selected value. Touching the spinner displays a dropdown menu with all other available values, from which the user can select a new one.

You can add a spinner to your layout with the Spinner object. You should usually do so in your xml layout with a  <spinner>  element.
For example:
 <Spinner
   
        android:id="@+id/myspinner"   
        android:layout_width="fill_parent"
        android:layout_height="wrap_content" />

Here we go with java source code:
in java file:
 
public class simplespinnersactivity extends Activity implements OnItemSelectedListener {
TextView selection;
String[] items = { "this", "is", "a","really","a" "simple","list", "in", "android", "ok" };

@Override
public void onCreate(Bundle savedInstanceState)
{
super.onCreate(savedInstanceState);
setContentView(R.layout.main);
selection = (TextView) findViewById(R.id.selection);
Spinner spin = (Spinner) findViewById(R.id.spinner);
spin.setOnItemSelectedListener(this);
ArrayAdapter aa = new ArrayAdapter(this,android.R.layout.simple_spinner_item,items);
aa.setDropDownViewResource(android.R.layout.simple_spinner_dropdown_item);
spin.setAdapter(aa);
}
public void onItemSelected(AdapterView parent, View v,int position,long id)
{
selection.setText(items[position]);
}
public void onNothingSelected(AdapterView parent)
{
selection.setText("");
}
}

in xml file:
<?xml version="1.0" encoding="utf-8"?> 
<LinearLayout xmlns:android="http://schemas.android.com/apk/res/android"
android:orientation="vertical"
android:layout_width="fill_parent"
android:layout_height="fill_parent"
>
<TextView
android:id="@+id/selection"
android:layout_width="fill_parent"
android:layout_height="wrap_content"
android:text="@string/hello"/>

<Spinner
android:id="@+id/spinner"
android:layout_width="fill_parent"
android:layout_height="wrap_content"
android:drawSelectorOnTop = "true">

</Spinner>
</LinearLayout>

Baca Selengkapnya ....

Customize The Title Bar in Android

Posted by Unknown Rabu, 23 Januari 2013 0 komentar
xml for custom title bar:

< ?xml version="1.0" encoding="utf-8"?>
< LinearLayout xmlns:android="http://schemas.android.com/apk/res/android"
android:layout_width="fill_parent"
android:layout_height="wrap_content"
android:background="@drawable/titlebar>
< TextView
style="@style/MyRedTextAppearance"
android:padding="7dp"
android:id="@+id/txtvew_title"
android:layout_width="fill_parent"
android:layout_height="wrap_content"
android:layout_weight="1"
android:textColor="#FFFFFF"
android:textSize="20dp"
android:textStyle="bold"
android:gravity="center"/>
< /LinearLayout>
main.xml:
Include the above xml to the main xml as given below...

< RelativeLayout
xmlns:android="http://schemas.android.com/apk/res/android"
android:id="@+id/RelativeLayout1"
android:layout_width="fill_parent"
android:layout_height="fill_parent"
android:background="@drawable/redbg" >
< include
android:id="@+id/head"
layout="@layout/titlebaar" />
< LinearLayout
android:layout_width="fill_parent"
android:layout_height="fill_parent"
android:layout_below="@+id/head"
android:padding="5dp" >
--- ---- --- ---- --- --- -- --
--- --- ---- --- --- --- --- --
< /LinearLayout>
< /RelativeLayout>
in java class:

@Override
protected void onCreate(Bundle savedInstanceState) {
super.onCreate(savedInstanceState);
this.requestWindowFeature(Window.FEATURE_NO_TITLE);
setContentView(R.layout.show_image);

TextView t1 = (TextView) findViewById(R.id.txtvew_title);
t1.setText("Custom Title Bar");
t1.setTextColor(Color.RED);
}

Baca Selengkapnya ....

Option Menu in Android

Posted by Unknown Kamis, 17 Januari 2013 0 komentar
menu.xml :

< ?xml version="1.0" encoding="utf-8"?>
< menu xmlns:android="http://schemas.android.com/apk/res/android">
< item android:id="@+id/item1" android:title="Option 1"
android:icon="@android:drawable/ic_menu_compass"/>
< item android:id="@+id/item2" android:title="Option 2"
android:icon="@android:drawable/ic_menu_week"/>
< item android:id="@+id/item3" android:title="Option 3"
android:icon="@android:drawable/ic_menu_call"/>
< item android:id="@+id/item4" android:title="Option 4"
android:icon="@android:drawable/ic_menu_zoom"/>
< /menu>
Click on the menu button to open this menu
in java class :

public class OptionMenuActivity extends Activity {
/** Called when the activity is first created. */
@Override
public void onCreate(Bundle savedInstanceState) {
super.onCreate(savedInstanceState);
setContentView(R.layout.main);
}
@Override
public boolean onCreateOptionsMenu(Menu menu) {
// TODO Auto-generated method stub
MenuInflater inflater=getMenuInflater();
inflater.inflate(R.layout.menu,menu);
return super.onCreateOptionsMenu(menu);
}
@Override
public boolean onOptionsItemSelected(MenuItem item) {
// TODO Auto-generated method stub
if(item.getItemId()==R.id.item1)
{
Log.d("option","Option 1 was clicked");
}
if(item.getItemId()==R.id.item2)
{
System.out.println("item2 selected");
}
if(item.getItemId()==R.id.item3)
{
System.out.println("item3 selected");
}
if(item.getItemId()==R.id.item4)
{
System.out.println("item4 selected");
}
return super.onOptionsItemSelected(item);
}
}

Baca Selengkapnya ....

ContextMenu in Android

Posted by Unknown 0 komentar
Long click on the button to open the menu.
in java class:

public class ContextmenuActivity extends Activity {
/** Called when the activity is first created. */
@Override
public void onCreate(Bundle savedInstanceState) {
super.onCreate(savedInstanceState);
setContentView(R.layout.main);

Button b=(Button)findViewById(R.id.button1);
registerForContextMenu(b);
}
//create the menuuu======================
@Override
public void onCreateContextMenu(ContextMenu menu, View v,
ContextMenuInfo menuInfo) {
// TODO Auto-generated method stub
super.onCreateContextMenu(menu, v, menuInfo);
MenuInflater inflater=getMenuInflater();
inflater.inflate(R.layout.contextmenu, menu);

}
//click to each menu======================
@Override
public boolean onContextItemSelected(MenuItem item) {
// TODO Auto-generated method stub
if(item.getItemId()==R.id.item1)
{
System.out.println("item1 clicked");
}
if(item.getItemId()==R.id.item2)
{
System.out.println("item2 clicked");
}
if(item.getItemId()==R.id.item3)
{
System.out.println("item3 clicked");
}
if(item.getItemId()==R.id.item4)
{
System.out.println("item4 clicked");
}
return super.onContextItemSelected(item);
}}

Context Menu Xml:

< ?xml version="1.0" encoding="utf-8"?>
< menu xmlns:android="http://schemas.android.com/apk/res/android">
< group android:checkableBehavior="single">
< item android:id="@+id/item1" android:title="Item 1" />
< item android:id="@+id/item2" android:title="Item 2" />
< item android:id="@+id/item3" android:title="Item 3" />
< item android:id="@+id/item4" android:title="Item 4" />
< /group>
< /menu>
in main Xml:

< ?xml version="1.0" encoding="utf-8"?>
< RelativeLayout xmlns:android="http://schemas.android.com/apk/res/android"
android:layout_width="fill_parent"
android:layout_height="fill_parent"
android:orientation="vertical"
android:gravity="center">
< Button
android:id="@+id/button1"
android:layout_width="wrap_content"
android:layout_height="wrap_content"
android:text="Button" />
< /RelativeLayout>
         

Baca Selengkapnya ....

Custom AlertBox in Android

Posted by Unknown Rabu, 16 Januari 2013 0 komentar
in main.xml file:

< ?xml version="1.0" encoding="utf-8"?>
< LinearLayout xmlns:android="http://schemas.android.com/apk/res/android"
android:layout_width="fill_parent"
android:layout_height="fill_parent"
android:orientation="vertical" >

< Button
android:id="@+id/button1"
android:layout_width="120dp"
android:layout_height="wrap_content"
android:text="Button" />

< /LinearLayout>
in dialog.xml :(xml for custom dialog box) :

< ?xml version="1.0" encoding="utf-8"?>
< LinearLayout xmlns:android="http://schemas.android.com/apk/res/android"
android:layout_width="fill_parent"
android:layout_height="fill_parent"
android:orientation="vertical" >

< ImageView
android:id="@+id/imageView1"
android:layout_width="210dp"
android:layout_height="232dp"
android:padding="40dp"
android:src="@drawable/flower" />

< TextView
android:id="@+id/textView1"
android:layout_width="147dp"
android:layout_height="wrap_content"
android:text="This is a flower"
android:textSize="20dp"
android:layout_marginLeft="10dp"
android:layout_marginRight="10dp"
android:layout_marginBottom="10dp"/>

< /LinearLayout>
in java file:

Button b= (Button) findViewById(R.id.button1);
b.setOnClickListener(new OnClickListener() {
@Override
public void onClick(View v) {
// TODO Auto-generated method stub
Dialog d=new Dialog(CustomdialogActivity.this);
d.setContentView(R.layout.dialog);
d.setTitle("This is important");
d.show();
}
});


Baca Selengkapnya ....

Read from Asset and Write to a TextView

Posted by Unknown Jumat, 11 Januari 2013 0 komentar
Code for reading from a text file in asset folder to a textview:


public class Readfile extends Activity {
String path;
ArrayList data = new ArrayList();

@Override
public void onCreate(Bundle savedInstanceState) {
super.onCreate(savedInstanceState);
setContentView(R.layout.activity_main);
path = getResources().getString(R.string.directory1);
String[] data1 = null;
AssetManager am = getResources().getAssets();
try {
data1 = am.list(path);
} catch (Exception e) {
}
for (String name : data1) {
data.add(name);
}
Readoperation();
}
public void Readoperation() {
// TODO Auto-generated method stub
TextView txt = (TextView) findViewById(R.id.text);
try {
path=getResources().getString(R.string.directory1) +"/"+data.get(2);
InputStream stream = getAssets().open(path);
int size = stream.available();
byte[] buffer = new byte[size];
stream.read(buffer);
stream.close();
txt.setText(Html.fromHtml(new String(buffer).trim()));
}
catch (IOException e) {
}}

Baca Selengkapnya ....

Passing Images between Activities in Android

Posted by Unknown Senin, 07 Januari 2013 0 komentar
in First Activity:

Intent intent=new Intent(FirstClass.this, SecondClass.class);
Bundle bundle=new Bundle();
bundle.putInt("image",R.drawable.ic_launcher);
intent.putExtras(bundle);
startActivity(intent);
in Second Acticity:

Bundle bundle=this.getIntent().getExtras();
int pic=bundle.getInt("image");
v.setImageResource(pic);
another method:
in First Activity:

Drawable drawable=imgv.getDrawable();
Bitmap bitmap= ((BitmapDrawable)drawable).getBitmap();
ByteArrayOutputStream baos = new ByteArrayOutputStream();
bitmap.compress(Bitmap.CompressFormat.PNG, 100, baos);
byte[] b = baos.toByteArray();
Intent intent=new Intent(Passimage.this,myclass.class);
intent.putExtra("picture", b);
startActivity(intent);
in Second Acticity:

Bundle extras = getIntent().getExtras();
byte[] b = extras.getByteArray("picture");
Bitmap bmp = BitmapFactory.decodeByteArray(b, 0, b.length);
ImageView image = (ImageView) findViewById(R.id.imageView1);
image.setImageBitmap(bmp);

Baca Selengkapnya ....
Trik SEO Terbaru support Online Shop Baju Wanita - Original design by Bamz | Copyright of android populer.