Tampilkan postingan dengan label resource. Tampilkan semua postingan

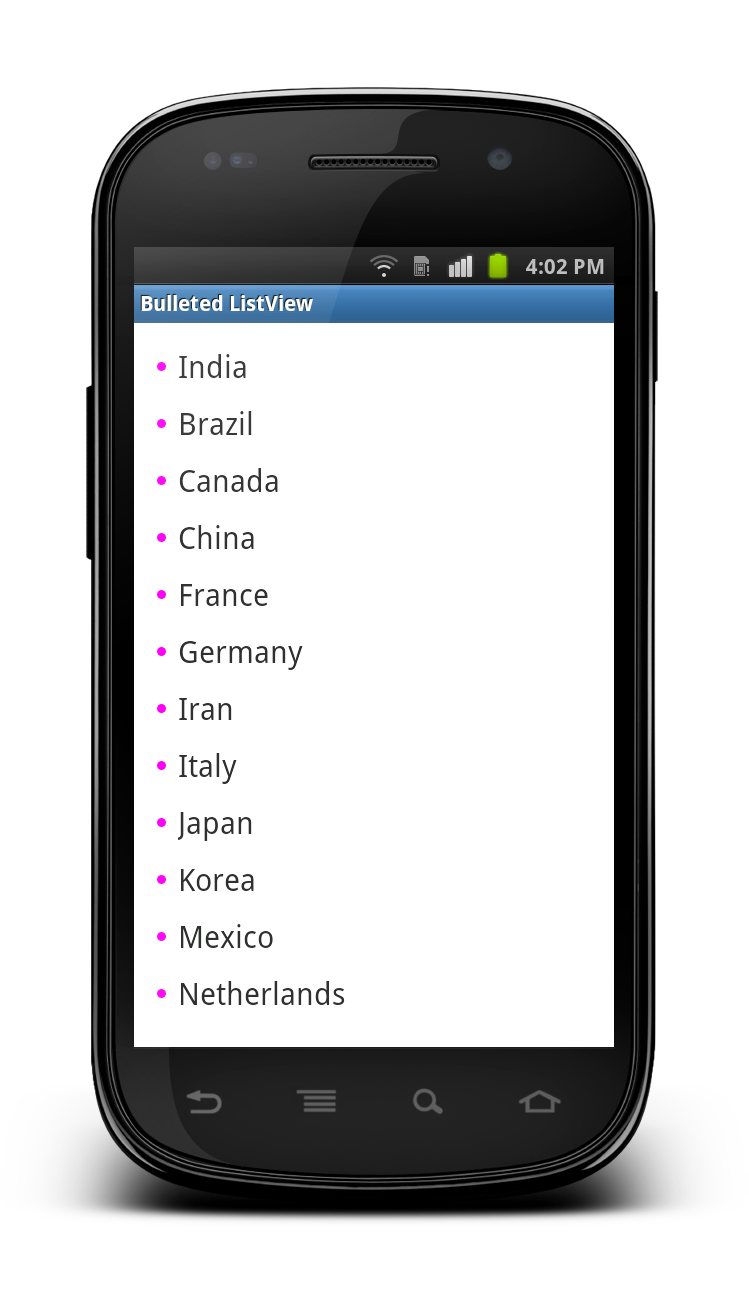
Android – Bullets in ListView

Posted by Unknown Senin, 18 Februari 2013 0 komentar
main.xml :
<?xml version="1.0" encoding="utf-8"?> 
<LinearLayout
xmlns:android="http://schemas.android.com/apk/res/android"
android:layout_width="fill_parent"
android:layout_height="fill_parent"
android:orientation="vertical"
android:padding="10dp">

<ListView
android:id="@+id/listView"
android:layout_width="fill_parent"
android:layout_height="wrap_content"
android:listSelector="@android:color/transparent"
android:divider="@null"/>
</LinearLayout>
create a bullet.xml in drawable folder:
<?xml version="1.0" encoding="utf-8"?> 
<shape xmlns:android="http://schemas.android.com/apk/res/android"
android:shape="oval">
<size
android:height="6dp"
android:width="6dp"/>
<solid android:color="#FF00F0"/>
</shape>
list_item.xml for creating custom listview:
<?xml version="1.0" encoding="utf-8"?> 
<TextView xmlns:android="http://schemas.android.com/apk/res/android"
android:id="@+id/itemText"
android:layout_width="wrap_content"
android:layout_height="wrap_content"
android:drawableLeft="@drawable/bullet"
android:drawablePadding="8dp"
android:padding="5dp"
android:text="List Item"
android:textSize="20sp"/>
BulletListViewActivity.java
public class BulletedListViewActivity extends Activity {
/** Called when the activity is first created. */
ArrayList<string> listCountry;
@Override
public void onCreate(Bundle savedInstanceState) {
super.onCreate(savedInstanceState);
setContentView(R.layout.main);
prepareList();
ListView listView = (ListView)findViewById(R.id.listView);
listView.setAdapter(new ArrayAdapter<string>(
this, R.layout.list_item, listCountry));
}
public void prepareList()
{
listCountry = new ArrayList<string>();
listCountry.add("India");
listCountry.add("Brazil");
listCountry.add("Canada");
listCountry.add("China");
listCountry.add("France");
listCountry.add("Germany");
listCountry.add("Iran");
listCountry.add("Italy");
listCountry.add("Japan");
listCountry.add("Korea");
listCountry.add("Mexico");
listCountry.add("Netherlands");
listCountry.add("Portugal");
listCountry.add("Russia");
listCountry.add("Saudi Arabia");
listCountry.add("Spain");
listCountry.add("Turkey");
listCountry.add("United Kingdom");
listCountry.add("United States");
}}
                

Baca Selengkapnya ....

Fragmentation In Android

Posted by Unknown Minggu, 17 Februari 2013 0 komentar

See more basics on Android along with interview questions

Fragments are a portion of an Activity:
Load a fragment Activity to call a fragment :
public class MainActivity extends FragmentActivity {
@Override
protected void onCreate(Bundle savedInstanceState) {
super.onCreate(savedInstanceState);
setContentView(R.layout.activity_main);
} }
activity_main :
<LinearLayout xmlns:android="http://schemas.android.com/apk/res/android"
android:layout_width="match_parent"
android:layout_height="match_parent"
android:orientation="horizontal">
<fragment
android:id="@+id/titles"
android:layout_width="0px"
android:layout_height="match_parent"
android:layout_weight="1"
class="com.example.googlefragment.TitlesFragment"/>
//calls the fragment
</LinearLayout>
TitlesFragment :
public class TitlesFragment extends android.support.v4.app.ListFragment {
boolean mDualPane;
int mCurCheckPosition = 0;
String titles[] = { "Item one", "Item two", "Item three" };
@Override
public void onActivityCreated(Bundle savedInstanceState) {
super.onActivityCreated(savedInstanceState);
// Populate list with our static array of titles.setListAdapter(new ArrayAdapter(getActivity(),
android.R.layout.simple_dropdown_item_1line,titles));

// Check to see if we have a frame in which to embed the details
// fragment directly in the containing UI.
View detailsFrame = getActivity().findViewById(R.id.details);
mDualPane = detailsFrame != null && detailsFrame.getVisibility() == View.VISIBLE;
if (savedInstanceState != null) {
// Restore last state for checked position.
mCurCheckPosition = savedInstanceState.getInt("curChoice", 0);
}
if (mDualPane) {
// In dual-pane mode, the list view highlights the selected item.
getListView().setChoiceMode(ListView.CHOICE_MODE_SINGLE);
// Make sure our UI is in the correct state.
showDetails(mCurCheckPosition);
}else
{
System.out.println("NOT DUAL");
} }

@Override
public void onSaveInstanceState(Bundle outState) {
super.onSaveInstanceState(outState);
outState.putInt("curChoice", mCurCheckPosition);
}
@Override
public void onListItemClick(ListView l, View v,int position,long id) {
showDetails(position);
}
void showDetails(int index) {
mCurCheckPosition = index;
if (mDualPane) {
// We can display everything in-place with fragments,so update
// the list to highlight the selected item and show the data.
getListView().setItemChecked(index, true);
// Check what fragment is currently shown,replace if needed.
DetailsFragment details = (DetailsFragment)
getFragmentManager().findFragmentById(R.id.details);
if (details == null || details.getShownIndex()!=index) {
// Make new fragment to show this selection.
details = DetailsFragment.newInstance(index);
// Execute a transaction, replacing any existing fragment
// with this one inside the frame.
FragmentTransaction ft = getFragmentManager().beginTransaction();
ft.replace(R.id.details, details);
ft.setTransition(FragmentTransaction.TRANSIT_FRAGMENT_FADE);
ft.commit();
}
} else {
// Otherwise we need to launch a new activity to display
// the dialog fragment with selected text.
Intent intent = new Intent();
intent.setClass(getActivity(),DetailsActivity.class);
intent.putExtra("index", index);
startActivity(intent);
} }}
DetailsActivity :
public class DetailsActivity extends FragmentActivity {
@Override
protected void onCreate(Bundle savedInstanceState) {
super.onCreate(savedInstanceState);
if (getResources().getConfiguration().orientation == Configuration.ORIENTATION_LANDSCAPE) {
setContentView(R.layout.details_lay);
System.out.println("LANNNNNNNNNNN");
return;
}
if (savedInstanceState == null) {
System.out.println("LLLLLLLLLLL");
Fragment details = new DetailsFragment();
details.setArguments(getIntent().getExtras());
getSupportFragmentManager().beginTransaction()
.add(android.R.id.content, details).commit();

} } }
details_lay:
<LinearLayout xmlns:android="http://schemas.android.com/apk/res/android"
android:layout_width="match_parent"
android:layout_height="match_parent"
android:orientation="horizontal">
<LinearLayout
android:id="@+id/details"
android:layout_width="0px"
android:layout_height="match_parent"
android:layout_weight="1"
class="com.example.googlefragment.DetailsFragment"/>
</LinearLayout>
DetailsFragment :
public class DetailsFragment extends Fragment {
static int i = 0;
public static DetailsFragment newInstance(int index) {
DetailsFragment f = new DetailsFragment();
// Supply index input as an argument.
Bundle args = new Bundle();
args.putInt("index", index);
i = index;
f.setArguments(args);
return f;
}
public int getShownIndex() {
return getArguments().getInt("index", 0);
}
@Override
public View onCreateView(LayoutInflater inflater,ViewGroup container,Bundle savedInstanceState){
if (container == null) {
return null;
}
WebView wv = new WebView(getActivity());
wv.loadData("Hello " + i, "text/html", "utf-8");
return wv;
} }
NOTE: Put layout under two separate folder for layout and portrait.


Baca Selengkapnya ....

Frame by Frame Animation in Android

Posted by Unknown Selasa, 15 Januari 2013 0 komentar
Call a new xml file which includes the frames that are to be loaded:

< ?xml version="1.0" encoding="utf-8"?>
< animation-list android:oneshot="false" xmlns:android="http://schemas.android.com/apk/res/android">
< item android:drawable="@drawable/frame_above95_1" android:duration="30"/>
< item android:drawable="@drawable/frame_above95_2" android:duration="30"/>
< item android:drawable="@drawable/frame_above95_3" android:duration="30"/>
< item android:drawable="@drawable/frame_above95_4" android:duration="30"/>
< item android:drawable="@drawable/frame_above95_5" android:duration="30"/>
< item android:drawable="@drawable/frame_above95_6" android:duration="30"/>
< item android:drawable="@drawable/frame_above95_7" android:duration="30"/>
< item android:drawable="@drawable/frame_above95_8" android:duration="30"/>
< item android:drawable="@drawable/frame_above95_9" android:duration="30"/>
< item android:drawable="@drawable/frame_above95_10" android:duration="30"/>
< item android:drawable="@drawable/frame_above95_11" android:duration="30"/>
< item android:drawable="@drawable/frame_above95_12" android:duration="30"/>
< item android:drawable="@drawable/frame_above95_13" android:duration="30"/>
< item android:drawable="@drawable/frame_above95_14" android:duration="30"/>
< item android:drawable="@drawable/frame_above95_15" android:duration="30"/>
< item android:drawable="@drawable/frame_above95_16" android:duration="30"/>
< item android:drawable="@drawable/frame_above95_17" android:duration="30"/>
< item android:drawable="@drawable/frame_above95_18" android:duration="30"/>
< /animation-list>
in java file:

img1.setBackgroundResource(R.layout.animation_above95);
AnimationDrawable anim=(AnimationDrawable)img1.getBackground();
anim.start();

Baca Selengkapnya ....

Download an Image from Url and Display it in a ImageView

Posted by Unknown 0 komentar

Bitmap bmImg;
ImageView img1;
@Override
protected void onCreate(Bundle savedInstanceState) {
// TODO Auto-generated method stub
super.onCreate(savedInstanceState);
setContentView(R.layout.sending_card);
img1=(ImageView) findViewById(R.id.imageView1);
String url="http://i.123g.us/c/efeb_valen_happy/card/107397.gif";
downloadFile(url);
}
void downloadFile(String fileUrl){
URL myFileUrl =null;
try {
myFileUrl= new URL(fileUrl);
} catch (MalformedURLException e) {
// TODO Auto-generated catch block
e.printStackTrace();
}
try {
HttpURLConnection conn=
(HttpURLConnection)myFileUrl.openConnection();
conn.setDoInput(true);
conn.connect();
InputStream is = conn.getInputStream();
bmImg = BitmapFactory.decodeStream(is);
img1.setImageBitmap(bmImg);
} catch (IOException e) {
// TODO Auto-generated catch block
e.printStackTrace();
}}

Baca Selengkapnya ....
Trik SEO Terbaru support Online Shop Baju Wanita - Original design by Bamz | Copyright of android populer.