Tampilkan postingan dengan label textview. Tampilkan semua postingan

Customized Spinners in Android

Posted by Unknown Rabu, 24 April 2013 0 komentar

See more basics on Android along with interview questions

The Android Spinner Control is definitely the equivalent of the drop-down selector . By making use of spinner control you basically obtain the capability to choose from a list without taking up all of the display screen space of a ListView.

Spinners provide a quick way to select one value from a set. In the default state, a spinner shows its currently selected value. Touching the spinner displays a dropdown menu with all other available values, from which the user can select a new one.

You can add a spinner to your layout with the Spinner object. You should usually do so in your xml layout with a  <spinner>  element. For example:
 <Spinner
    android:id="@+id/myspinner"
    android:layout_width="fill_parent"
    android:layout_height="wrap_content" />

Here we are going to deal with Customized Spinners.Here we go with java code samples.

in java file:
public class Custom_spinner extends Activity {
String[] data1 = { "Java", "Android","Blackberry", "Apple", "Windows" };

String[] data2 = { "Developed by Sun Microsystems", "Android is a Linux-based operating system",
"Designed and marketed by Research In Motion Limited ","Designed and marketed by Apple Inc"
,"developed, marketed, and sold by Microsoft."};

Integer[] images = { R.drawable.java, R.drawable.android,
R.drawable.blackberry, R.drawable.apple, R.drawable.windows };

/** Called when the activity is first created. */
@Override
public void onCreate(Bundle savedInstanceState) {
super.onCreate(savedInstanceState);
setContentView(R.layout.custom_spinner);
Spinner mySpinner = (Spinner) findViewById(R.id.spinner1);
mySpinner.setAdapter(new MyAdapter(this, R.layout.cus_row, data1));
}

public class MyAdapter extends ArrayAdapter<String> {

public MyAdapter(Context context, int textViewResourceId,
String[] objects) {
super(context, textViewResourceId, objects);
// TODO Auto-generated constructor stub
}

@Override
public View getDropDownView(int position, View convertView,
ViewGroup parent) {
return getCustomView(position, convertView, parent);
}

@Override
public View getView(int position, View convertView, ViewGroup parent) {
return getCustomView(position, convertView, parent);
}

public View getCustomView(int position, View convertView,
ViewGroup parent) {

LayoutInflater inflater = getLayoutInflater();//inflate xml for each row
View row = inflater.inflate(R.layout.cus_row, parent, false);
TextView label = (TextView) row.findViewById(R.id.textView1);
label.setText(data1[position]);

TextView sub = (TextView) row.findViewById(R.id.textView2);
sub.setText(data2[position]);

ImageView icon = (ImageView) row.findViewById(R.id.imageView1);
icon.setImageResource(images[position]);

return row;
} }}

in custom_spinner.xml (main xml file) :
<RelativeLayout xmlns:android="http://schemas.android.com/apk/res/android"
xmlns:tools="http://schemas.android.com/tools"
android:layout_width="match_parent"
android:layout_height="match_parent"
android:padding="10dp" >
<Spinner

android:id="@+id/spinner1"
android:layout_width="match_parent"
android:layout_height="wrap_content"
android:drawSelectorOnTop="true"
android:background="@drawable/purple"
>
</Spinner>
</RelativeLayout>
in cus_row.xml (inflated xml file) :
<?xml version="1.0" encoding="utf-8"?>
<RelativeLayout xmlns:android="http://schemas.android.com/apk/res/android"
android:id="@+id/relativeLayout1"
android:layout_width="match_parent"
android:layout_height="wrap_content"
android:padding="3dip" >

<LinearLayout
android:layout_width="wrap_content"
android:layout_height="wrap_content"
android:orientation="horizontal" >

<ImageView
android:id="@+id/imageView1"
android:layout_width="wrap_content"
android:layout_height="wrap_content"
android:src="@drawable/ic_launcher" >
</ImageView>
</LinearLayout>

<LinearLayout
android:layout_width="wrap_content"
android:layout_height="wrap_content"
android:orientation="vertical"
android:paddingLeft="70dp" >

<TextView
android:id="@+id/textView1"
android:layout_width="wrap_content"
android:layout_height="wrap_content"
android:textStyle="bold" >
</TextView>

<TextView
android:id="@+id/textView2"
android:layout_width="wrap_content"
android:layout_height="wrap_content" >
</TextView>
</LinearLayout>

</RelativeLayout>
@drawable/purple.xml :


Baca Selengkapnya ....

Falling Animation in ANDROID using Animation of Translate

Posted by Unknown Sabtu, 20 April 2013 0 komentar
Falling animation is used to bring transition to a view between two X points or two Y points. In Android, you can apply this scaling effect to almost anything, from simple text, to images, buttons, etc…

in res/anim/falling.xml
suppose if transition to be done between two different X indexes use..
 
<?xml version="1.0" encoding="utf-8"?>
<set xmlns:android="http://schemas.android.com/apk/res/android"
android:interpolator="@android:anim/linear_interpolator">
<translate
android:fromXDelta="-100%p"
android:toXDelta="0"
android:duration="2000"/>
</set>

suppose if transition to be done between two different Y indexes use..
 
<?xml version="1.0" encoding="utf-8"?>
<set xmlns:android="http://schemas.android.com/apk/res/android"
android:interpolator="@android:anim/linear_interpolator">
<translate
android:fromYDelta="-100%p"
android:toYDelta="0"
android:duration="2000"/>
</set> 
The java source code is given below
 
public class Textviewanimation extends Activity {
TextView tv;
Button startanimation;

@Override
public void onCreate(Bundle savedInstanceState) {
super.onCreate(savedInstanceState);
setContentView(R.layout.activity_textviewanimation);

tv=(TextView) findViewById(R.id.textview);
startanimation=(Button) findViewById(R.id.button1);
tv.setText("Android is a Linux-based operating system designed primarily for touchscreen mobile devices such as smartphones and tablet computers.");

final Animation falling = AnimationUtils.loadAnimation(this,R.anim.falling);
startanimation.setOnClickListener(new OnClickListener() {
@Override
public void onClick(View arg0) {
tv.startAnimation(falling);
}
}); }
}
see more :

Baca Selengkapnya ....

Scaling Animation In ANDROID

Posted by Unknown Jumat, 19 April 2013 0 komentar
Scaling animation is used to scale a view. In Android, you can apply this scaling effect to almost anything, from simple text, to images, buttons, etc…

 Here simply I will explain a scaling textview which you can apply to other views also... In res/anim/scale.xml
 
<?xml version="1.0" encoding="utf-8"?>
<set xmlns:android="http://schemas.android.com/apk/res/android"
android:interpolator="@android:anim/linear_interpolator">
<scale
android:fromXScale="0.0"
android:toXScale="1.0"
android:fromYScale="0.0"
android:toYScale="1.0"
android:pivotX="50%"
android:pivotY="50%"
android:duration="2000" />
</set>
Java source code is given below
 
public class Textviewanimation extends Activity {
Animation fadeIn,fadeOut;
TextView tv;
Button startanimation;

@Override
public void onCreate(Bundle savedInstanceState) {
super.onCreate(savedInstanceState);
setContentView(R.layout.activity_textviewanimation);

tv=(TextView) findViewById(R.id.textview);
startanimation=(Button) findViewById(R.id.button1);
tv.setText("This is an animated textview");

final Animation Scale = AnimationUtils.loadAnimation(this,R.anim.scale);
startanimation.setOnClickListener(new OnClickListener() {
@Override
public void onClick(View arg0) {
tv.startAnimation(Scale);
}
}); }
}
see more: 

Baca Selengkapnya ....

TextView Animation or Alpha animation (FadeIn , FadeOut) in ANDROID

Posted by Unknown 0 komentar
An Alpha Animation is animation that controls the alpha level of an object, i.e. fading it in and out. In Android, you can apply that fading effect to almost anything, from simple text, to images, buttons, check boxes, etc…
 
This can be done both from xml and from java class.

Here I will explain a simple way to give a FadeIn and FadeOut for a textview on button click..
 

public class Textviewanimation extends Activity {

Animation fadeIn,fadeOut;
TextView tv;
Button startanimation;
Boolean fadeflag=true;

@Override
public void onCreate(Bundle savedInstanceState) {
super.onCreate(savedInstanceState);
setContentView(R.layout.activity_textviewanimation);

tv=(TextView) findViewById(R.id.textview);
startanimation=(Button) findViewById(R.id.button1);

fadeIn = new AlphaAnimation(0.0f , 1.0f ) ;
fadeIn.setDuration(1200);
fadeIn.setFillAfter(true);

fadeOut = new AlphaAnimation(1.0f , 0.0f);
fadeOut.setDuration(1200);
fadeOut.setFillAfter(true);

startanimation.setText("Start fadeIn");
startanimation.setOnClickListener(new OnClickListener() {

@Override
public void onClick(View arg0) {

if(fadeflag)
{
startanimation.setText("Start fadeOut");
tv.setText("This is an animated textview");
tv.startAnimation(fadeIn);
fadeflag=false;
}
else
{
startanimation.setText("Start fadeIn");
tv.setText("This is an animated textview");
tv.startAnimation(fadeOut);
fadeflag=true;
} } });
}
}

This same can be done with xml by creating an xml in res/anim/fadein


and res/anim/fadeout


Then in java
 
Animation animationFadeIn = AnimationUtils.loadAnimation(this,R.anim.fadein);
tv.startAnimation(animationFadeIn);
same way call the other

see more 
Falling animation ..

Baca Selengkapnya ....

Simple AutoComplete TextView in ANDROID

Posted by Unknown Jumat, 22 Maret 2013 0 komentar

public class Autocomplete extends Activity {
String name[]={
"John", "Angel", "Mark", "Angelina",
"Jhony", "Juli", "Augustine", "Robert",
"Reena", "Ancilina", "Mary", "Juliet"
};
AutoCompleteTextView autotextview;
@Override
protected void onCreate(Bundle savedInstanceState) {
super.onCreate(savedInstanceState);
setContentView(R.layout.activity_autocomplete);

autotextview=(AutoCompleteTextView) findViewById(R.id.myautocomplete);
autotextview.setAdapter(new ArrayAdapter<string>(this, android.R.layout.simple_dropdown_item_1line, name));

}

Baca Selengkapnya ....

TextView with link in ANDROID…….

Posted by Unknown Senin, 04 Maret 2013 0 komentar
in java class:
import android.app.Activity;
import android.os.Bundle;
import android.text.Html;
import android.text.method.LinkMovementMethod;
import android.widget.TextView;

public class TextViewLinkDemo extends Activity {
@Override
public void onCreate(Bundle savedInstanceState) {
super.onCreate(savedInstanceState);
setContentView(R.layout.main);
TextView tv = (TextView) findViewById(R.id.tv);
tv.setText( Html.fromHtml("This is a textView with a link " +"
AngelMark Blog "
+ "created in the Java source code using HTML."));
tv.setMovementMethod(LinkMovementMethod.getInstance());
}
}
main.xml:

<?xml version="1.0" encoding="utf-8"?>
<LinearLayout xmlns:android="http://schemas.android.com/apk/res/android"
android:orientation="vertical"
android:layout_width="fill_parent"
android:layout_height="fill_parent"
>
<TextView
android:id="@+id/tv"
android:layout_width="fill_parent"
android:layout_height="wrap_content"
android:text="@string/hello"
/>
</LinearLayout>
In Manifest file give internet permission

Baca Selengkapnya ....

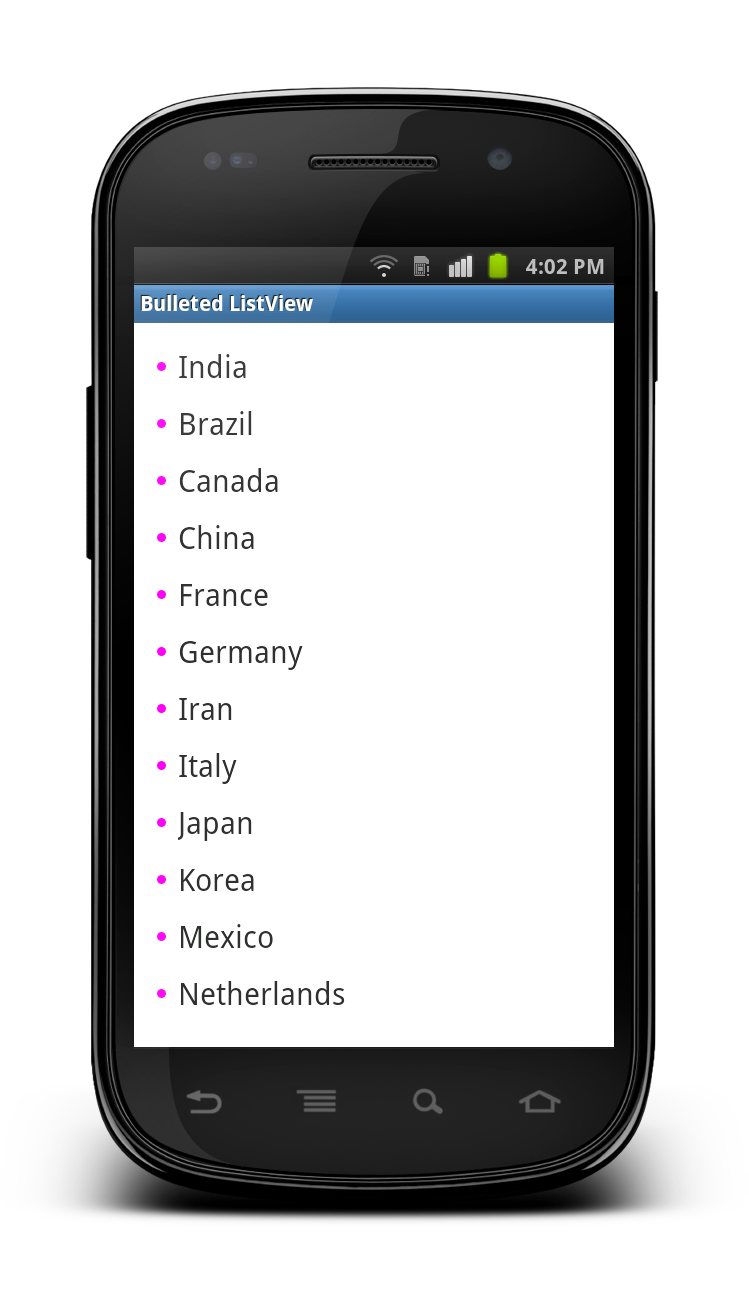
Android – Bullets in ListView

Posted by Unknown Senin, 18 Februari 2013 0 komentar
main.xml :
<?xml version="1.0" encoding="utf-8"?> 
<LinearLayout
xmlns:android="http://schemas.android.com/apk/res/android"
android:layout_width="fill_parent"
android:layout_height="fill_parent"
android:orientation="vertical"
android:padding="10dp">

<ListView
android:id="@+id/listView"
android:layout_width="fill_parent"
android:layout_height="wrap_content"
android:listSelector="@android:color/transparent"
android:divider="@null"/>
</LinearLayout>
create a bullet.xml in drawable folder:
<?xml version="1.0" encoding="utf-8"?> 
<shape xmlns:android="http://schemas.android.com/apk/res/android"
android:shape="oval">
<size
android:height="6dp"
android:width="6dp"/>
<solid android:color="#FF00F0"/>
</shape>
list_item.xml for creating custom listview:
<?xml version="1.0" encoding="utf-8"?> 
<TextView xmlns:android="http://schemas.android.com/apk/res/android"
android:id="@+id/itemText"
android:layout_width="wrap_content"
android:layout_height="wrap_content"
android:drawableLeft="@drawable/bullet"
android:drawablePadding="8dp"
android:padding="5dp"
android:text="List Item"
android:textSize="20sp"/>
BulletListViewActivity.java
public class BulletedListViewActivity extends Activity {
/** Called when the activity is first created. */
ArrayList<string> listCountry;
@Override
public void onCreate(Bundle savedInstanceState) {
super.onCreate(savedInstanceState);
setContentView(R.layout.main);
prepareList();
ListView listView = (ListView)findViewById(R.id.listView);
listView.setAdapter(new ArrayAdapter<string>(
this, R.layout.list_item, listCountry));
}
public void prepareList()
{
listCountry = new ArrayList<string>();
listCountry.add("India");
listCountry.add("Brazil");
listCountry.add("Canada");
listCountry.add("China");
listCountry.add("France");
listCountry.add("Germany");
listCountry.add("Iran");
listCountry.add("Italy");
listCountry.add("Japan");
listCountry.add("Korea");
listCountry.add("Mexico");
listCountry.add("Netherlands");
listCountry.add("Portugal");
listCountry.add("Russia");
listCountry.add("Saudi Arabia");
listCountry.add("Spain");
listCountry.add("Turkey");
listCountry.add("United Kingdom");
listCountry.add("United States");
}}


Baca Selengkapnya ....

Spinners in Android

Posted by Unknown Kamis, 24 Januari 2013 0 komentar
The Android Spinner Control is definitely the equivalent of the drop-down selector . By making use of spinner control you basically obtain the capability to choose from a list without taking up all of the display screen space of a ListView.

Spinners provide a quick way to select one value from a set. In the default state, a spinner shows its currently selected value. Touching the spinner displays a dropdown menu with all other available values, from which the user can select a new one.

You can add a spinner to your layout with the Spinner object. You should usually do so in your xml layout with a  <spinner>  element.
For example:
 <Spinner
   
        android:id="@+id/myspinner"   
        android:layout_width="fill_parent"
        android:layout_height="wrap_content" />

Here we go with java source code:
in java file:
 
public class simplespinnersactivity extends Activity implements OnItemSelectedListener {
TextView selection;
String[] items = { "this", "is", "a","really","a" "simple","list", "in", "android", "ok" };

@Override
public void onCreate(Bundle savedInstanceState)
{
super.onCreate(savedInstanceState);
setContentView(R.layout.main);
selection = (TextView) findViewById(R.id.selection);
Spinner spin = (Spinner) findViewById(R.id.spinner);
spin.setOnItemSelectedListener(this);
ArrayAdapter aa = new ArrayAdapter(this,android.R.layout.simple_spinner_item,items);
aa.setDropDownViewResource(android.R.layout.simple_spinner_dropdown_item);
spin.setAdapter(aa);
}
public void onItemSelected(AdapterView parent, View v,int position,long id)
{
selection.setText(items[position]);
}
public void onNothingSelected(AdapterView parent)
{
selection.setText("");
}
}

in xml file:
<?xml version="1.0" encoding="utf-8"?> 
<LinearLayout xmlns:android="http://schemas.android.com/apk/res/android"
android:orientation="vertical"
android:layout_width="fill_parent"
android:layout_height="fill_parent"
>
<TextView
android:id="@+id/selection"
android:layout_width="fill_parent"
android:layout_height="wrap_content"
android:text="@string/hello"/>

<Spinner
android:id="@+id/spinner"
android:layout_width="fill_parent"
android:layout_height="wrap_content"
android:drawSelectorOnTop = "true">

</Spinner>
</LinearLayout>

Baca Selengkapnya ....

Blinking TextView - Two Methods

Posted by Unknown Rabu, 23 Januari 2013 0 komentar
METHOD 1

private void blink(){
final Handler handler = new Handler();
new Thread(new Runnable() {
public void run() {
int timeToBlink = 600; //in milissegunds
try
{
Thread.sleep(timeToBlink);
}catch (Exception e)
{

}handler.post(new Runnable()
{
public void run()
{
TextView txt = (TextView)findViewById(R.id.usage);
if(txt.getVisibility() == View.VISIBLE)
{
txt.setVisibility(View.INVISIBLE);
}else
{
txt.setVisibility(View.VISIBLE);
}
blink();
}
});
}
}).start();
}
METHOD 2

TextView myText = (TextView) findViewById(R.id.usage );
Animation anim = new AlphaAnimation(0.0f, 1.0f);
anim.setDuration(50);
//You can manage the time of the blink with this parameter
anim.setStartOffset(20);
anim.setRepeatMode(Animation.REVERSE);
anim.setRepeatCount(Animation.INFINITE);
myText.startAnimation(anim);

Baca Selengkapnya ....

Vertical Text in Xml in Android

Posted by Unknown Selasa, 15 Januari 2013 0 komentar
A simple way is to insert a \n after each character, and make sure that the the height is set to fill_parent.

< TextView
android:layout_width="wrap_content"
android:layout_height="fill_parent"
android:text="h\ne\nl\nl\no\n w\no\nr\nl\nd" />

Baca Selengkapnya ....
Trik SEO Terbaru support Online Shop Baju Wanita - Original design by Bamz | Copyright of android populer.