Tampilkan postingan dengan label xml. Tampilkan semua postingan

How to align your TabHost at the bottom of the screen

Posted by Unknown Kamis, 14 November 2013 0 komentar
There is a simplest way to align Tabbar at the bottom of the page.
The code is given below copy and download the code and try it...

In the previous example we learned a simple example to add Tabs to our application.Only a small change can give you tabs at the bottom of the page.

In the previous example the xml was like this...
 

<TabHost xmlns:android="http://schemas.android.com/apk/res/android"
xmlns:tools="http://schemas.android.com/tools"
android:id="@android:id/tabhost"
android:layout_width="fill_parent"
android:layout_height="fill_parent"
tools:context=".MainActivity" >

<LinearLayout
android:layout_width="fill_parent"
android:layout_height="fill_parent"
android:orientation="vertical" >

<TabWidget
android:id="@android:id/tabs"
android:layout_width="fill_parent"
android:layout_height="wrap_content" />

<FrameLayout
android:id="@android:id/tabcontent"
android:layout_width="fill_parent"
android:layout_height="fill_parent" />

</LinearLayout>

Instead of using Linear Layout use Relative Layout like below and use "android:layout_alignParentBottom="true"" for Tab Widget.
 
<TabHost xmlns:android="http://schemas.android.com/apk/res/android"
xmlns:tools="http://schemas.android.com/tools"
android:id="@android:id/tabhost"
android:layout_width="fill_parent"
android:layout_height="fill_parent"
tools:context=".MainActivity" >

<RelativeLayout
android:layout_height="fill_parent"
android:layout_width="fill_parent">


<TabWidget
android:id="@android:id/tabs"
android:layout_alignParentBottom="true"
android:layout_width="fill_parent"
android:layout_height="wrap_content" />

<FrameLayout
android:id="@android:id/tabcontent"
android:layout_width="fill_parent"
android:layout_height="fill_parent" />
</RelativeLayout>

</TabHost>

Baca Selengkapnya ....

Change Tabbar Text (title) dynamically in Android - a simple example

Posted by Unknown Senin, 11 November 2013 0 komentar
Changing title of tabbar is bit easier in android
Copy and download the code below and try it....

Basic tabbar tutorials see here...
 
import android.os.Bundle;
import android.view.View;
import android.view.View.OnClickListener;
import android.widget.TabHost;
import android.widget.TabHost.TabSpec;
import android.widget.TabWidget;
import android.widget.TextView;
import android.app.TabActivity;
import android.content.Intent;


public class MainActivity extends TabActivity {

TabWidget tw;
TabHost tabHost;
@Override
protected void onCreate(Bundle savedInstanceState) {
super.onCreate(savedInstanceState);
setContentView(R.layout.activity_main);

/** TabHost will have Tabs */
tabHost = (TabHost)findViewById(android.R.id.tabhost);

TabSpec firstTabSpec = tabHost.newTabSpec("tab_id1");
TabSpec secondTabSpec = tabHost.newTabSpec("tab_id2");
TabSpec thirdTabSpec = tabHost.newTabSpec("tab_id3");

firstTabSpec.setIndicator("First").setContent(new Intent(this,Tab1.class));
secondTabSpec.setIndicator("Second ").setContent(new Intent(this,Tab2.class));
thirdTabSpec.setIndicator("Third").setContent(new Intent(this,Tab3.class));


tabHost.addTab(firstTabSpec);
tabHost.addTab(secondTabSpec);
tabHost.addTab(thirdTabSpec);

tw = getTabWidget();
View tab1View = tw.getChildAt(0);
tab1View.setId(1);

View tab2View = tw.getChildAt(1);
tab2View.setId(2);

View tab3View = tw.getChildAt(2);
tab3View.setId(3);

tab1View.setOnClickListener(new OnClickListener() {
public void onClick(View v) {
((TextView)tabHost.getTabWidget().getChildAt(v.getId()-1).findViewById(android.R.id.title)).setText("my Tab " + v.getId());
}
});

tab2View.setOnClickListener(new OnClickListener() {
public void onClick(View v) {
((TextView)tabHost.getTabWidget().getChildAt(v.getId()-1).findViewById(android.R.id.title)).setText("my Tab " + v.getId());
}
});

tab3View.setOnClickListener(new OnClickListener() {
public void onClick(View v) {
((TextView)tabHost.getTabWidget().getChildAt(v.getId()-1).findViewById(android.R.id.title)).setText("my Tab " + v.getId());
}
});

} }


Baca Selengkapnya ....

Using TabHost to create a simple Tabbar application - An Android Example

Posted by Unknown Minggu, 10 November 2013 0 komentar
For creating a tabbar application first create a tabhost object to create tabs
In activity_main.xml we create TabHost and specify a layout where we are going to insert the tabs.
Copy and download the code and try it yourself....

Now we are going to create three tabs.
Lets us now first make the xml for it

activity_main.xml :
TabHost provided flexibility of managing data in different views by providing tabbed interface(compared to TabLayout). TabHost basically a container, where you need to put tab widget, which will host tabbed interface and FrameLayout, within which the different views are presented.
  • TabHost ( main container of tab view )
  • TabWidget ( used to navigate between tabs )
  • FrameLayout ( for tab content )
 
<TabHost xmlns:android="http://schemas.android.com/apk/res/android"
xmlns:tools="http://schemas.android.com/tools"
android:id="@android:id/tabhost"
android:layout_width="fill_parent"
android:layout_height="fill_parent"
tools:context=".MainActivity" >

<LinearLayout
android:layout_width="fill_parent"
android:layout_height="fill_parent"
android:orientation="vertical" >

<TabWidget
android:id="@android:id/tabs"
android:layout_width="fill_parent"
android:layout_height="wrap_content" />

<FrameLayout
android:id="@android:id/tabcontent"
android:layout_width="fill_parent"
android:layout_height="fill_parent" />

</LinearLayout>

tab1.xml :
 
<?xml version="1.0" encoding="utf-8"?>
<LinearLayout
xmlns:android="http://schemas.android.com/apk/res/android"
android:orientation="vertical"
android:layout_width="fill_parent"
android:layout_height="fill_parent">

<TextView android:text="TAB1 DATA"
android:padding="15dip"
android:textSize="18dip"
android:layout_width="fill_parent"
android:layout_height="wrap_content"/>
</LinearLayout>
tab2.xml :
 
<?xml version="1.0" encoding="utf-8"?>
<LinearLayout
xmlns:android="http://schemas.android.com/apk/res/android"
android:orientation="vertical"
android:layout_width="fill_parent"
android:layout_height="fill_parent">

<TextView android:text="TAB2 DATA"
android:padding="15dip"
android:textSize="18dip"
android:layout_width="fill_parent"
android:layout_height="wrap_content"/>
</LinearLayout>
tab3.xml :
 
<?xml version="1.0" encoding="utf-8"?>
<LinearLayout
xmlns:android="http://schemas.android.com/apk/res/android"
android:orientation="vertical"
android:layout_width="fill_parent"
android:layout_height="fill_parent">

<TextView android:text="TAB3 DATA"
android:padding="15dip"
android:textSize="18dip"
android:layout_width="fill_parent"
android:layout_height="wrap_content">
</LinearLayout>
Now create three java class for each of the tabs..

Tab1.java :
 
import android.app.Activity;
import android.os.Bundle;

public class Tab1 extends Activity {

@Override
protected void onCreate(Bundle savedInstanceState) {
// TODO Auto-generated method stub
super.onCreate(savedInstanceState);
setContentView(R.layout.tab1);
}
}
Tab2.java :
 
import android.app.Activity;
import android.os.Bundle;

public class Tab2 extends Activity {
@Override
protected void onCreate(Bundle savedInstanceState) {
// TODO Auto-generated method stub
super.onCreate(savedInstanceState);
setContentView(R.layout.tab2);
}

}
Tab3.java :
 
import android.app.Activity;
import android.os.Bundle;

public class Tab3 extends Activity {
@Override
protected void onCreate(Bundle savedInstanceState) {
// TODO Auto-generated method stub
super.onCreate(savedInstanceState);
setContentView(R.layout.tab3);
}

}
Donot forget to introduce the newly created java class to the android manifest file...

AndroidManifest.xml


Mainactivity.java
  • TabSpec used to create a new tab.
  • By using TabSpec only we can able to setContent to the tab.
  • By using TabSpec setIndicator() we can set name to tab.
 
import android.os.Bundle;
import android.widget.TabHost;
import android.widget.TabHost.TabSpec;
import android.app.TabActivity;
import android.content.Intent;


public class MainActivity extends TabActivity {

@Override
protected void onCreate(Bundle savedInstanceState) {
super.onCreate(savedInstanceState);
setContentView(R.layout.activity_main);

/** TabHost will have Tabs */
TabHost tabHost = (TabHost)findViewById(android.R.id.tabhost);

TabSpec firstTabSpec = tabHost.newTabSpec("tab_id1");
TabSpec secondTabSpec = tabHost.newTabSpec("tab_id2");
TabSpec thirdTabSpec = tabHost.newTabSpec("tab_id3");

firstTabSpec.setIndicator("First").setContent(new Intent(this,Tab1.class));
secondTabSpec.setIndicator("Second ").setContent(new Intent(this,Tab2.class));
thirdTabSpec.setIndicator("Third").setContent(new Intent(this,Tab3.class));

tabHost.addTab(firstTabSpec);
tabHost.addTab(secondTabSpec);
tabHost.addTab(thirdTabSpec);

} }


Baca Selengkapnya ....

Custom Toggle Button in ANDROID

Posted by Unknown Kamis, 20 Juni 2013 0 komentar
Toggle Button is a special button that has two states  for eg :"on" and "off".It can be an alternative to Radio Buttons.
Method to create a Custom Toggle Button is given below :

in custom_btn.xml


in style.xml :


in custom_toggle_bg.xml :


in custom_toggle_btn.xml :


Baca Selengkapnya ....

Delete A row in ListView with Animation

Posted by Unknown Senin, 17 Juni 2013 0 komentar
Listview is simply a group of view that displays a list of scrolling items. "Adapters" are used to insert list items to the list.By default we are able to provide only text as list items.In order to delete a row from listview, copy or download this javacode and try yourself.
Also see here :
java file :
public class SimpleListViewActivity extends Activity {

private ListView mainListView;
private ArrayAdapter<String> listAdapter;
ArrayList<String> all_rowtext = new ArrayList<String>() ;
@Override
public void onCreate(Bundle savedInstanceState) {
super.onCreate(savedInstanceState);
setContentView(R.layout.main);
// Find the ListView resource.
mainListView = (ListView) findViewById(R.id.mainListView);
all_rowtext.add("Angel");
all_rowtext.add("Mark");
all_rowtext.add("Coding");
all_rowtext.add("Playground");
all_rowtext.add("For");
all_rowtext.add("All");
all_rowtext.add("Android");
all_rowtext.add("Coderz");
// Create ArrayAdapter using the planet list.
listAdapter = new ArrayAdapter<String>(this, R.layout.singlerow,
all_rowtext);
// Set the ArrayAdapter as the ListView's adapter.
mainListView.setAdapter(listAdapter);
mainListView
.setOnItemClickListener(new AdapterView.OnItemClickListener() {
public void onItemClick(AdapterView<?> parent,
View rowView, int positon, long id) {
Toast.makeText(rowView.getContext(), "" + positon,
Toast.LENGTH_LONG).show();
removeListItem(rowView, positon);
}
});
}

protected void removeListItem(View rowView, final int positon) {
final Animation animation = AnimationUtils.loadAnimation(
SimpleListViewActivity.this, android.R.anim.slide_in_left);
rowView.startAnimation(animation);
Handler handle = new Handler();
handle.postDelayed(new Runnable() {

public void run() {
all_rowtext.remove(positon);
listAdapter.notifyDataSetChanged();
}
}, 1000);
}}

Baca Selengkapnya ....

Customized Spinners in Android

Posted by Unknown Rabu, 24 April 2013 0 komentar

See more basics on Android along with interview questions

The Android Spinner Control is definitely the equivalent of the drop-down selector . By making use of spinner control you basically obtain the capability to choose from a list without taking up all of the display screen space of a ListView.

Spinners provide a quick way to select one value from a set. In the default state, a spinner shows its currently selected value. Touching the spinner displays a dropdown menu with all other available values, from which the user can select a new one.

You can add a spinner to your layout with the Spinner object. You should usually do so in your xml layout with a  <spinner>  element. For example:
 <Spinner
    android:id="@+id/myspinner"
    android:layout_width="fill_parent"
    android:layout_height="wrap_content" />

Here we are going to deal with Customized Spinners.Here we go with java code samples.

in java file:
public class Custom_spinner extends Activity {
String[] data1 = { "Java", "Android","Blackberry", "Apple", "Windows" };

String[] data2 = { "Developed by Sun Microsystems", "Android is a Linux-based operating system",
"Designed and marketed by Research In Motion Limited ","Designed and marketed by Apple Inc"
,"developed, marketed, and sold by Microsoft."};

Integer[] images = { R.drawable.java, R.drawable.android,
R.drawable.blackberry, R.drawable.apple, R.drawable.windows };

/** Called when the activity is first created. */
@Override
public void onCreate(Bundle savedInstanceState) {
super.onCreate(savedInstanceState);
setContentView(R.layout.custom_spinner);
Spinner mySpinner = (Spinner) findViewById(R.id.spinner1);
mySpinner.setAdapter(new MyAdapter(this, R.layout.cus_row, data1));
}

public class MyAdapter extends ArrayAdapter<String> {

public MyAdapter(Context context, int textViewResourceId,
String[] objects) {
super(context, textViewResourceId, objects);
// TODO Auto-generated constructor stub
}

@Override
public View getDropDownView(int position, View convertView,
ViewGroup parent) {
return getCustomView(position, convertView, parent);
}

@Override
public View getView(int position, View convertView, ViewGroup parent) {
return getCustomView(position, convertView, parent);
}

public View getCustomView(int position, View convertView,
ViewGroup parent) {

LayoutInflater inflater = getLayoutInflater();//inflate xml for each row
View row = inflater.inflate(R.layout.cus_row, parent, false);
TextView label = (TextView) row.findViewById(R.id.textView1);
label.setText(data1[position]);

TextView sub = (TextView) row.findViewById(R.id.textView2);
sub.setText(data2[position]);

ImageView icon = (ImageView) row.findViewById(R.id.imageView1);
icon.setImageResource(images[position]);

return row;
} }}

in custom_spinner.xml (main xml file) :
<RelativeLayout xmlns:android="http://schemas.android.com/apk/res/android"
xmlns:tools="http://schemas.android.com/tools"
android:layout_width="match_parent"
android:layout_height="match_parent"
android:padding="10dp" >
<Spinner

android:id="@+id/spinner1"
android:layout_width="match_parent"
android:layout_height="wrap_content"
android:drawSelectorOnTop="true"
android:background="@drawable/purple"
>
</Spinner>
</RelativeLayout>
in cus_row.xml (inflated xml file) :
<?xml version="1.0" encoding="utf-8"?>
<RelativeLayout xmlns:android="http://schemas.android.com/apk/res/android"
android:id="@+id/relativeLayout1"
android:layout_width="match_parent"
android:layout_height="wrap_content"
android:padding="3dip" >

<LinearLayout
android:layout_width="wrap_content"
android:layout_height="wrap_content"
android:orientation="horizontal" >

<ImageView
android:id="@+id/imageView1"
android:layout_width="wrap_content"
android:layout_height="wrap_content"
android:src="@drawable/ic_launcher" >
</ImageView>
</LinearLayout>

<LinearLayout
android:layout_width="wrap_content"
android:layout_height="wrap_content"
android:orientation="vertical"
android:paddingLeft="70dp" >

<TextView
android:id="@+id/textView1"
android:layout_width="wrap_content"
android:layout_height="wrap_content"
android:textStyle="bold" >
</TextView>

<TextView
android:id="@+id/textView2"
android:layout_width="wrap_content"
android:layout_height="wrap_content" >
</TextView>
</LinearLayout>

</RelativeLayout>
@drawable/purple.xml :


Baca Selengkapnya ....

BroadcastReceiver for Screen On/Off in ANDROID

Posted by Unknown Senin, 22 April 2013 0 komentar
If wanted to call a broadcast for screen on/off you can get the code sniffet from here.
Here I have used dynamic calling of Broadcast and the java source code is given below.

get more details about broadcast from :
in java file:
 
public class MainActivity extends Activity {
//Create broadcast object
BroadcastReceiver mybroadcast = new BroadcastReceiver() {

//When Event is published, onReceive method is called
@Override
public void onReceive(Context context, Intent intent) {
// TODO Auto-generated method stub
Log.i("[BroadcastReceiver]", "MyReceiver");

if(intent.getAction().equals(Intent.ACTION_SCREEN_ON)){
Log.i("[BroadcastReceiver]", "Screen ON");
}
else if(intent.getAction().equals(Intent.ACTION_SCREEN_OFF)){
Log.i("[BroadcastReceiver]", "Screen OFF");
}
}};

@Override
public void onCreate(Bundle savedInstanceState) {
super.onCreate(savedInstanceState);
setContentView(R.layout.activity_main);

registerReceiver(mybroadcast, new IntentFilter(Intent.ACTION_SCREEN_ON));
registerReceiver(mybroadcast, new IntentFilter(Intent.ACTION_SCREEN_OFF));
}
}

Baca Selengkapnya ....

BroadcastReceiver to get Battery Level - simple Example using dynamic calling of BroadCast in ANDROID

Posted by Unknown Senin, 08 April 2013 0 komentar
See Introduction for Broadcast Receiver here:

 When you need to call a broadcast (suppose here battery value) you need to register the broadcast and when the event is published it will call onReceive method which have context and particular intent as parameter.

 
public class Broadcast extends Activity {
//Create broadcast object
BroadcastReceiver mybroadcast = new BroadcastReceiver() {

//When Event is published, onReceive method is called
@Override
public void onReceive(Context context, Intent intent) {
//Get battery percentage
int batterylevel = intent.getIntExtra("level", 0);
//get progressbar
ProgressBar myprogressbar = (ProgressBar) findViewById(R.id.progressbar);
myprogressbar.setProgress(batterylevel);
TextView tv = (TextView) findViewById(R.id.textfield);
//Set TextView with text
tv.setText("Battery Level: " + Integer.toString(batterylevel) + "%");
}
};

@Override
public void onCreate(Bundle savedInstanceState) {
super.onCreate(savedInstanceState);
setContentView(R.layout.activity_broadcast);
registerReceiver(mybroadcast, new IntentFilter(Intent.ACTION_BATTERY_CHANGED));
}
}
The arguments of the registerReceiver() method
receiver :: The BroadcastReceiver you want to register
filter :: The IntentFilter object that specifies which event your receiver should listen to.

To learn more on event and usages click here...

Baca Selengkapnya ....

Get Id of inflated xml in ANDROID

Posted by Unknown Selasa, 19 Maret 2013 0 komentar
How to inflate an xml see my previous post.
Suppose we have button in the inflated xml we can get the id like this:
 Button b1= (Button) v1.findViewById(R.id.button1); 
//where v1 is the View

Baca Selengkapnya ....

How to enable and disable Wifi in ANDROID?

Posted by Unknown Rabu, 13 Maret 2013 0 komentar

WifiManager wifi = (WifiManager) getSystemService(Context.WIFI_SERVICE);
wifi.setWifiEnabled(enabled);

Baca Selengkapnya ....

Using external font in ANDROID

Posted by Unknown Selasa, 12 Maret 2013 0 komentar
    

TextView text =(TextView) findViewById(R.id.textview);
Typeface face;
face = Typeface.createFromAsset(getAssets(), "AMAZB.TTF");
text.setTypeface(face);
text.setTextSize(30);
text.setTextColor(Color.WHITE);

Baca Selengkapnya ....

Inflate an xml in ANDROID

Posted by Unknown 0 komentar
  RelativeLayout mainLayout = (RelativeLayout)findViewById(R.id.relative);
//create a view to inflate the layout_item (
the xml with the textView created before)
View view = getLayoutInflater().inflate(R.layout.inflate,mainLayout,false);
//add the view to the main layout
mainLayout.addView(view);


Baca Selengkapnya ....

Merge two layouts in xml

Posted by Unknown 0 komentar
In any one of the xml include the other xml like this :

<include layout="@layout/newxmlname"/>

Baca Selengkapnya ....

Parsing an XML from Online in Android

Posted by Unknown Senin, 04 Maret 2013 0 komentar
Create a fresh project and name it ParseXMLDemo
Then in the ParseXMLDemo.java file copy this code
|
import java.util.ArrayList;
import java.util.HashMap;
import org.w3c.dom.Document;
import org.w3c.dom.Element;
import org.w3c.dom.NodeList;
import android.app.ListActivity;
import android.os.Bundle;
import android.view.View;
import android.widget.AdapterView;
import android.widget.ListAdapter;
import android.widget.ListView;
import android.widget.SimpleAdapter;
import android.widget.Toast;
import android.widget.AdapterView.OnItemClickListener;

public class ParseXMLDemo extends ListActivity {
@Override
public void onCreate(Bundle savedInstanceState) {
super.onCreate(savedInstanceState);
setContentView(R.layout.main);

ArrayList<String> mylist = new ArrayList<String>();
String xml = ParseXMLMethods.getXML();
Document doc = ParseXMLMethods.XMLfromString(xml);
int numResults = ParseXMLMethods.numResults(doc);

if((numResults <= 0)){
Toast.makeText(ParseXMLDemo.this, "There is no data in the xml file", Toast.LENGTH_LONG).show();
finish();
}

NodeList children = doc.getElementsByTagName("os");
for (int i = 0; i < children.getLength(); i++)
{
HashMap<string string=""> map =new HashMap<string string="">();
Element e = (Element)children.item(i);
map.put("id", ParseXMLMethods.getValue(e, "id"));
map.put("name", ParseXMLMethods.getValue(e, "name"));
map.put("site", ParseXMLMethods.getValue(e, "site"));
mylist.add(map);
}
ListAdapter adapter = new SimpleAdapter(this,mylist ,R .layout.list_layout,
new String[] { "name", "site" },
new int[] { R.id.title, R.id.subtitle});

setListAdapter(adapter);


final ListView lv = getListView();
lv.setOnItemClickListener(new OnItemClickListener() {
public void onItemClick(AdapterView parent, View view, int position, long id) {
@SuppressWarnings("unchecked")
HashMap<String, String> o = (HashMap<String, String>) lv.getItemAtPosition(position);
Toast.makeText(ParseXMLDemo.this,o.get("name"), Toast.LENGTH_LONG).show();
}
});
} }

Now create another java file inside the src folder and name it ParseXMLMethods.java and copy this contents into it.
import java.io.IOException;
import java.io.StringReader;
import javax.xml.parsers.DocumentBuilder;
import javax.xml.parsers.DocumentBuilderFactory;
import javax.xml.parsers.ParserConfigurationException;
import org.apache.http.HttpEntity;
import org.apache.http.HttpResponse;
import org.apache.http.client.methods.HttpPost;
import org.apache.http.impl.client.DefaultHttpClient;
import org.apache.http.util.EntityUtils;
import org.w3c.dom.Document;
import org.w3c.dom.Element;
import org.w3c.dom.Node;
import org.w3c.dom.NodeList;
import org.xml.sax.InputSource;
import org.xml.sax.SAXException;

public class ParseXMLMethods {

public final static Document XMLfromString(String xml){

Document doc = null;
DocumentBuilderFactory dbf = DocumentBuilderFactory.newInstance();
try {
DocumentBuilder db = dbf.newDocumentBuilder();
InputSource is = new InputSource();
is.setCharacterStream(new StringReader(xml));
doc = db.parse(is);
}
catch (ParserConfigurationException e) {
System.out.println("XML parse error: " + e.getMessage());
return null;
}
catch (SAXException e) {
System.out.println("Wrong XML file structure: " +e.getMessage());
return null;
}
catch (IOException e) {
System.out.println("I/O exeption: " +e.getMessage());
return null;
}
return doc;
}
public final static String getElementValue( Node elem ) {
Node kid;
if( elem != null){
if (elem.hasChildNodes()){
for( kid = elem.getFirstChild(); kid != null;kid = kid.getNextSibling() ){
if( kid.getNodeType() == Node.TEXT_NODE ){
return kid.getNodeValue();
}
}
}
}
return "";
}
public static String getXML(){
String line = null;
try {
DefaultHttpClient httpClient = new DefaultHttpClient();
HttpPost httpPost = new HttpPost("http://new ABC.com/xml/test.xml");
HttpResponse httpResponse = httpClient.execute(httpPost);
HttpEntity httpEntity = httpResponse.getEntity();
line = EntityUtils.toString(httpEntity);
} catch (Exception e) {
line = "Internet Connection Error >> " + e.getMessage();
}
return line;
}

public static int numResults(Document doc)
{
Node results = doc.getDocumentElement();
int res = -1;
try
{
res = Integer.valueOf(results.getAttributes()
.getNamedItem("count").getNodeValue());
}catch(Exception e ){
res = -1;
}
return res;
}

public static String getValue(Element item, String str)
{
NodeList n = item.getElementsByTagName(str);
return ParseXMLMethods.getElementValue(n.item(0));
}
}
in main.xml:
<LinearLayout xmlns:android="http://schemas.android.com/apk/res/android"
android:orientation="vertical"
android:layout_width="fill_parent"
android:layout_height="fill_parent">

<ListView
android:id="@id/android:list"
android:layout_width="fill_parent"
android:layout_height="wrap_content"
android:layout_weight="1"
android:background="#FF0000"
android:drawSelectorOnTop="false"/>
</LinearLayout>
list_layout.xml:
< ?xml version="1.0" encoding="utf-8"?> 
<LinearLayout xmlns:android="http://schemas.android.com/apk/res/android"
android:orientation="vertical"
android:layout_width="fill_parent"
android:layout_height="fill_parent"
android:padding="7dp">
<TextView
android:id="@+id/title"
android:layout_width="fill_parent"
android:layout_height="wrap_content"
android:textAppearance="?android:attr/textAppearanceMedium"
android:padding="2dp"
android:textSize="20dp"
android:textStyle="bold"/>
<TextView
android:id="@+id/subtitle"
android:layout_width="fill_parent"
android:layout_height="wrap_content"
android:padding="2dp"
android:textSize="14dp"
android:textColor="#000000"/>
</LinearLayout>
Strings.xml:
<?xml version="1.0" encoding="utf-8"?> 
<resources>
<string name="hello"> Hello World, ParseXMLDemo!</string>
<string name="app_name"> ParseXMLDemo New ABC.com</string>
</resources>

Baca Selengkapnya ....

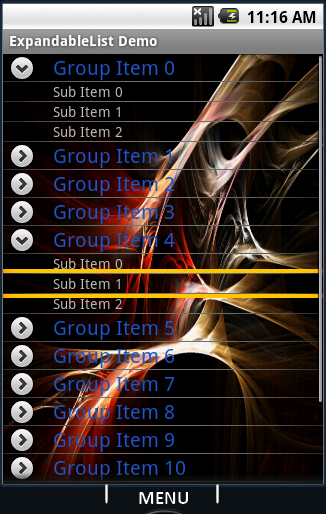
Expandable ListView in ANDROID

Posted by Unknown Jumat, 01 Maret 2013 0 komentar
java.class

public class Expandablelistview extends ExpandableListActivity {
@Override
public void onCreate(Bundle savedInstanceState) {
super.onCreate(savedInstanceState);
setContentView(R.layout.expandablelistview);
SimpleExpandableListAdapter expListAdapter =
new SimpleExpandableListAdapter(
this,
createGroupList(),
R.layout.group_row,
new String[] { "Item" },
new int[] { R.id.row_name },
createChildList(),
R.layout.child_row,
new String[] {"Sub Item"},
new int[] { R.id.grp_child});
setListAdapter( expListAdapter );
}

// hash map for row

private List createGroupList() {
ArrayList result = new ArrayList();
for (int i = 0; i < 15; ++i) { // 15 groups........
HashMap m = new HashMap();
m.put("Item", "Item " + i); // the key and it's value.
result.add(m);
}
return (List) result;
}

/* creatin the HashMap for the children */

private List createChildList() {
ArrayList result = new ArrayList();
for (int i = 0; i < 15; ++i) {
ArrayList secList = new ArrayList();
for (int n = 0; n < 3; n++)
{
HashMap child = new HashMap();
child.put("Sub Item", "Sub Item " + n);
secList.add(child);
}
result.add(secList);
}
return result;
}


public void onGroupExpand(int groupPosition) {
try
{
System.out.println("Group exapanding
Listener => groupPosition = "
+ groupPosition);
} catch (Exception e) {
System.out.println(" groupPosition Errrr +++ "
+ e.getMessage());
} } }

expandablelistview.xml:

<?xml version="1.0" encoding="utf-8"?>
<LinearLayout xmlns:android="http://schemas.android.com/apk/res/android"
android:orientation="vertical"
android:layout_width="fill_parent"
android:layout_height="fill_parent"
>
<ExpandableListView android:id="@+id/android:list"
android:layout_width="fill_parent"
android:layout_height="fill_parent"
android:background="@drawable/bkg"/>

<TextView android:id="@+id/android:empty"
android:layout_width="fill_parent"
android:layout_height="fill_parent"
android:text="No items"/>
</LinearLayout>

child_row.xml:
 

<?xml version="1.0" encoding="utf-8"?>
<LinearLayout xmlns:android="http://schemas.android.com/apk/res/android"
android:orientation="horizontal"
android:layout_width="fill_parent"
android:layout_height="wrap_content">
< TextView android:id="@+id/grp_child"
android:paddingLeft="50px"
android:focusable="false"
android:textSize="14px"
android:textStyle="normal"
android:layout_width="150px"
android:layout_height="wrap_content"/>
</LinearLayout>
group_row.xml

<?xml version="1.0" encoding="utf-8"?>
<LinearLayout xmlns:android="http://schemas.android.com/apk/res/android"
android:orientation="horizontal"
android:layout_width="fill_parent"
android:layout_height="fill_parent">

<TextView android:id="@+id/row_name"
android:paddingLeft="50px"
android:textSize="20px"
android:textStyle="normal"
android:layout_width="320px"
android:layout_height="wrap_content"/>

</LinearLayout>


Baca Selengkapnya ....

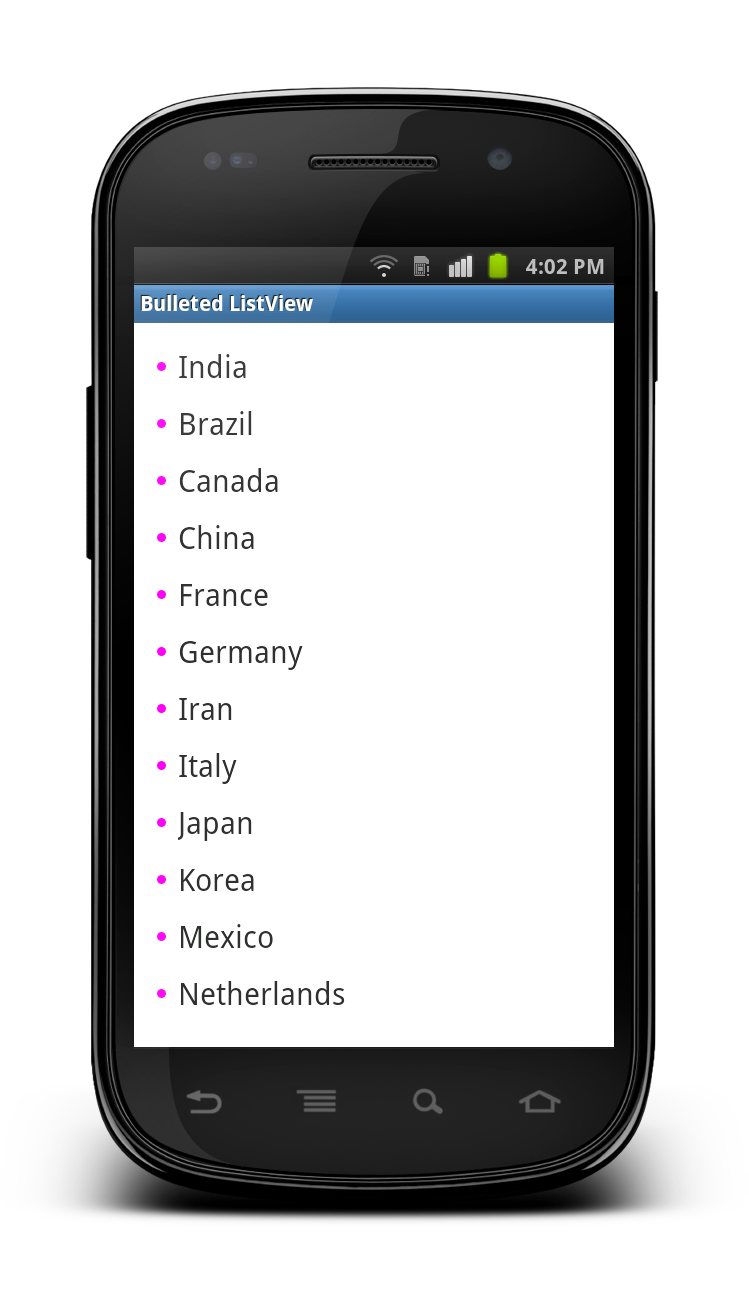
Android – Bullets in ListView

Posted by Unknown Senin, 18 Februari 2013 0 komentar
main.xml :
<?xml version="1.0" encoding="utf-8"?> 
<LinearLayout
xmlns:android="http://schemas.android.com/apk/res/android"
android:layout_width="fill_parent"
android:layout_height="fill_parent"
android:orientation="vertical"
android:padding="10dp">

<ListView
android:id="@+id/listView"
android:layout_width="fill_parent"
android:layout_height="wrap_content"
android:listSelector="@android:color/transparent"
android:divider="@null"/>
</LinearLayout>
create a bullet.xml in drawable folder:
<?xml version="1.0" encoding="utf-8"?> 
<shape xmlns:android="http://schemas.android.com/apk/res/android"
android:shape="oval">
<size
android:height="6dp"
android:width="6dp"/>
<solid android:color="#FF00F0"/>
</shape>
list_item.xml for creating custom listview:
<?xml version="1.0" encoding="utf-8"?> 
<TextView xmlns:android="http://schemas.android.com/apk/res/android"
android:id="@+id/itemText"
android:layout_width="wrap_content"
android:layout_height="wrap_content"
android:drawableLeft="@drawable/bullet"
android:drawablePadding="8dp"
android:padding="5dp"
android:text="List Item"
android:textSize="20sp"/>
BulletListViewActivity.java
public class BulletedListViewActivity extends Activity {
/** Called when the activity is first created. */
ArrayList<string> listCountry;
@Override
public void onCreate(Bundle savedInstanceState) {
super.onCreate(savedInstanceState);
setContentView(R.layout.main);
prepareList();
ListView listView = (ListView)findViewById(R.id.listView);
listView.setAdapter(new ArrayAdapter<string>(
this, R.layout.list_item, listCountry));
}
public void prepareList()
{
listCountry = new ArrayList<string>();
listCountry.add("India");
listCountry.add("Brazil");
listCountry.add("Canada");
listCountry.add("China");
listCountry.add("France");
listCountry.add("Germany");
listCountry.add("Iran");
listCountry.add("Italy");
listCountry.add("Japan");
listCountry.add("Korea");
listCountry.add("Mexico");
listCountry.add("Netherlands");
listCountry.add("Portugal");
listCountry.add("Russia");
listCountry.add("Saudi Arabia");
listCountry.add("Spain");
listCountry.add("Turkey");
listCountry.add("United Kingdom");
listCountry.add("United States");
}}


Baca Selengkapnya ....

How to write interfaces in java or Android?

Posted by Unknown 0 komentar
what is an Interface?
An interface is a collection of abstract methods. A class implements an interface, thereby inheriting the abstract methods of the interface.
An interface is not a class. Writing an interface is similar to writing a class, but they are two different concepts. A class describes the attributes and behaviors of an object. An interface contains behaviors that a class implements.
Unless the class that implements the interface is abstract, all the methods of the interface need to be defined in the class.

MainActivity.java
public class MainActivity extends Activity implements Interface {
@Override
protected void onCreate(Bundle savedInstanceState) {
super.onCreate(savedInstanceState);
setContentView(R.layout.activity_main);
}
@Override
public void testFunctionOne() {
System.out.println("Print from testFunctionOne in the Interface");
}
@Override
public void testFunctionTwo() {
System.out.println("Print from testFunctionTwo in the Interface");
}}
in Interface.java
public interface Interface  {    
void testFunctionOne();
void testFunctionTwo(); }

Baca Selengkapnya ....

Spinners in Android

Posted by Unknown Kamis, 24 Januari 2013 0 komentar
The Android Spinner Control is definitely the equivalent of the drop-down selector . By making use of spinner control you basically obtain the capability to choose from a list without taking up all of the display screen space of a ListView.

Spinners provide a quick way to select one value from a set. In the default state, a spinner shows its currently selected value. Touching the spinner displays a dropdown menu with all other available values, from which the user can select a new one.

You can add a spinner to your layout with the Spinner object. You should usually do so in your xml layout with a  <spinner>  element.
For example:
 <Spinner
   
        android:id="@+id/myspinner"   
        android:layout_width="fill_parent"
        android:layout_height="wrap_content" />

Here we go with java source code:
in java file:
 
public class simplespinnersactivity extends Activity implements OnItemSelectedListener {
TextView selection;
String[] items = { "this", "is", "a","really","a" "simple","list", "in", "android", "ok" };

@Override
public void onCreate(Bundle savedInstanceState)
{
super.onCreate(savedInstanceState);
setContentView(R.layout.main);
selection = (TextView) findViewById(R.id.selection);
Spinner spin = (Spinner) findViewById(R.id.spinner);
spin.setOnItemSelectedListener(this);
ArrayAdapter aa = new ArrayAdapter(this,android.R.layout.simple_spinner_item,items);
aa.setDropDownViewResource(android.R.layout.simple_spinner_dropdown_item);
spin.setAdapter(aa);
}
public void onItemSelected(AdapterView parent, View v,int position,long id)
{
selection.setText(items[position]);
}
public void onNothingSelected(AdapterView parent)
{
selection.setText("");
}
}

in xml file:
<?xml version="1.0" encoding="utf-8"?> 
<LinearLayout xmlns:android="http://schemas.android.com/apk/res/android"
android:orientation="vertical"
android:layout_width="fill_parent"
android:layout_height="fill_parent"
>
<TextView
android:id="@+id/selection"
android:layout_width="fill_parent"
android:layout_height="wrap_content"
android:text="@string/hello"/>

<Spinner
android:id="@+id/spinner"
android:layout_width="fill_parent"
android:layout_height="wrap_content"
android:drawSelectorOnTop = "true">

</Spinner>
</LinearLayout>

Baca Selengkapnya ....

Blinking TextView - Two Methods

Posted by Unknown Rabu, 23 Januari 2013 0 komentar
METHOD 1

private void blink(){
final Handler handler = new Handler();
new Thread(new Runnable() {
public void run() {
int timeToBlink = 600; //in milissegunds
try
{
Thread.sleep(timeToBlink);
}catch (Exception e)
{

}handler.post(new Runnable()
{
public void run()
{
TextView txt = (TextView)findViewById(R.id.usage);
if(txt.getVisibility() == View.VISIBLE)
{
txt.setVisibility(View.INVISIBLE);
}else
{
txt.setVisibility(View.VISIBLE);
}
blink();
}
});
}
}).start();
}
METHOD 2

TextView myText = (TextView) findViewById(R.id.usage );
Animation anim = new AlphaAnimation(0.0f, 1.0f);
anim.setDuration(50);
//You can manage the time of the blink with this parameter
anim.setStartOffset(20);
anim.setRepeatMode(Animation.REVERSE);
anim.setRepeatCount(Animation.INFINITE);
myText.startAnimation(anim);

Baca Selengkapnya ....

Customize The Title Bar in Android

Posted by Unknown 0 komentar
xml for custom title bar:

< ?xml version="1.0" encoding="utf-8"?>
< LinearLayout xmlns:android="http://schemas.android.com/apk/res/android"
android:layout_width="fill_parent"
android:layout_height="wrap_content"
android:background="@drawable/titlebar>
< TextView
style="@style/MyRedTextAppearance"
android:padding="7dp"
android:id="@+id/txtvew_title"
android:layout_width="fill_parent"
android:layout_height="wrap_content"
android:layout_weight="1"
android:textColor="#FFFFFF"
android:textSize="20dp"
android:textStyle="bold"
android:gravity="center"/>
< /LinearLayout>
main.xml:
Include the above xml to the main xml as given below...

< RelativeLayout
xmlns:android="http://schemas.android.com/apk/res/android"
android:id="@+id/RelativeLayout1"
android:layout_width="fill_parent"
android:layout_height="fill_parent"
android:background="@drawable/redbg" >
< include
android:id="@+id/head"
layout="@layout/titlebaar" />
< LinearLayout
android:layout_width="fill_parent"
android:layout_height="fill_parent"
android:layout_below="@+id/head"
android:padding="5dp" >
--- ---- --- ---- --- --- -- --
--- --- ---- --- --- --- --- --
< /LinearLayout>
< /RelativeLayout>
in java class:

@Override
protected void onCreate(Bundle savedInstanceState) {
super.onCreate(savedInstanceState);
this.requestWindowFeature(Window.FEATURE_NO_TITLE);
setContentView(R.layout.show_image);

TextView t1 = (TextView) findViewById(R.id.txtvew_title);
t1.setText("Custom Title Bar");
t1.setTextColor(Color.RED);
}

Baca Selengkapnya ....
Trik SEO Terbaru support Online Shop Baju Wanita - Original design by Bamz | Copyright of android populer.