Tampilkan postingan dengan label Tricks. Tampilkan semua postingan

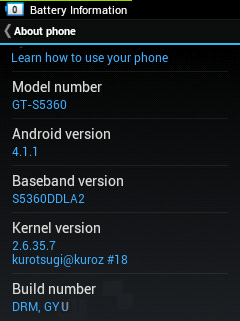
[Tricks] Change Your Build Number!!! [Root Required]

Posted by Unknown Senin, 05 November 2012 0 komentar
Here's a tutorial on how to change your SGY's build number to whatever you like!

Caution!: Don it on your own risk! It is advised to backup your rom before trying it just to be safe...

Your device needs to be rooted for doing this. First install "root explorer" from the app store and open the app. Next go to the system folder and press and hold "build.prop". After that press open with and open it with text editor. Now change the "ro.build.display.id=[your current build number]". Just change your current build number to whatever you like and save the file..

Now do the same thing but this time edit the build.prop inside system>framework.

Reboot

And you are Done!!!


Baca Selengkapnya ....

ADOBE PLAYER FOR EVERY BROWSER IN SGY

Posted by Unknown Selasa, 25 September 2012 0 komentar

ADOBE PLAYER FOR EVERY BROWSER IN SGY

Hi Guys, many times you have seen about Flash Player on Galaxy Y with moded Flash Player and UC Browser? Huh, it’s not the same; here you can enjoy flash player with any browser.

Note : Root Required Phone 

Flashing of Flash Player:

1. Copy the Adobe Flash Player & Lib.zip file to your SD Card or extract lib.zip from PC and send it to your SD Card.

2. Install Adobe_Flash_Player apk

3. After installing, goto any Root Browser.


4. Goto /data/data & goto com.adobe.flashplayer and open the folder; then delete existing lib folder.

5. After deleting, replace with one I have attached below the post.

6. When replaced, again goto /data/data/com.adobe.flashplayer/lib; then there are two files:
+ libflashplayer.so
+ libstagefright_froyo.so

7. Set & save permissions of libflashplayer.so to  
       r-r-no
        r-no-no
       r-no-no.....
here "r" refers to checking d box


8. Set & save permissions of libstagefright_froyo.so to

         r-r-no
        r-no-no
       r-no-no.....

here "r" refers to checking d box


9. Set & save the permissions of lib folder to

r-no-r
r-no-r
r-no-r


10. Now lastly, set & save permissions of com.adobe.flashplayer to

r-no-r
r-no-r
no-no-r


You’ve done with only 10 small & easy steps; it’s tested & 100% working on Stock ROM & Custom ROMs.

Download Links:


Baca Selengkapnya ....

Coin In Phone ! [Magic QVGA HD Apps For galaxy Y!]

Posted by Unknown Minggu, 15 Juli 2012 0 komentar

An astonishing magic trick you can perform with a phone, a coin and a marker.
A magic trick you can perform with a phone, a coin and a marker.
A coin is marked by a spectator, and appears to go below the phone glass. Initially the coin is stuck, but then it can be dragged under the glass, and then visually slides out of the phone.
Selected feedback from users:
♦ I have been a member of the Magic Castle for over 20 years and this is as good as it gets.
♦ Awesome effect. Very clever convincers. Clear instructions and customisable settings. I am so glad I found this.
♦ Top Banana ! Can't stop playing with this app. Very clever idea. I love doing magic and this has blown me away.
♦ By far amazing worth way more then asking!
♦ I have been a member of the Magic Castle for over 20 years and this is as good as it gets. This should nevrr have been released to the public

Supports many coins, and we add more when requested.
Supported coins are:
♦ US Dollar
♦ US half Dollar
♦ US gold Dollar
♦ US Morgan Dollar (back)
♦ US Quarter (eagle)
♦ US Quarter (face)
♦ US Nickel
♦ US Dime
♦ US Penny
♦ US liberty walking half dollar (both sides)
♦ US Coronet cent
♦ One Euro
♦ Two Euros
♦ 50 Euro cents
♦ UK 1,2 Pounds
♦ UK 2 pence, 10 pence
♦ Argentina 50 centavos
♦ Australian 10 cents
♦ Australian 20 cents
♦ Brazil 1 Real
♦ Chile 100 pesos (old and new)
♦ Denmark 10, 20 krone, 50 ore
♦ Iceland 1, 10 KR
♦ India 1 and 2 Rupees
♦ Israel 2,5, 10 Shekels, 10, 50 Agorot
♦ Japan 100, 500 Yen
♦ Korea 100, 500 Won
♦ Canada 10, 25 cents
♦ Canada dollar
♦ Hong Kong 1,2,10 dollar
♦ Indonesia 500, 1000 rupiah
♦ Jordan 10 piasters
♦ Kuwait 100 fils
♦ Latvia 2 lats
♦ Malaysia 50 sen, new 50 sen
♦ New Zealand 2 dollars
♦ Mexico 5 pesos
♦ Norway 5,10,20 Kroner
♦ Pakistan 2 rupee
♦ Philippines 1,5 peso
♦ Thailand 10 Baht
♦ Romania 50 bani
♦ Russia 2,5,10 Roubles
♦ Sweden 1,5 Krona
♦ Singapore 20 and 50 cents
♦ South Africa 5 rand
♦ Switzerland 1,2 francs
♦ UAW 1 dirham
♦ Folded bicycle cards, red and blue
♦ Poker Chip Red Spade
Note: When installed, the app name is "CiP" and the icon is a sketch of a coin on a sketch of a phone.
This is so that if others see this app name or icon, they do not suspect that it is about coin magic.

Video Demo: https://www.youtube.com/watch?v=mhz4jAPTPwQ

Download Link: APK


Baca Selengkapnya ....

[Tweak] Change your Carrier Name!!

Posted by Unknown Kamis, 12 Juli 2012 0 komentar
Want your own name as your carrier name??? simple steps...
1. Download Root explorer
2. Go to System/etc/
3.Extract file----->>> spn-conf.xml
4......zzzzzzz.
5. Cant do so much shit???
6. TJ to the rescue!!
7. Download the apk and CHANGE IT DIRECTLY!!! :D

Direct MEDIAFIRE!!

Support to get paid apps... ADFLY link... :P


Now... SHOW OFF!!!! take a nanodroid backup too...  

Baca Selengkapnya ....

Increase your Internal Memory with Link2sd

Posted by Unknown Jumat, 25 Mei 2012 0 komentar

..Hi..This is a tutorial for increasing your internal memory with a link2sd app..

Link2SD moves apk + dex + lib files of the application to the second partition and creates symbolic links in the original locations on internal storage. 
First advantage is that it can free up more space from the internal storage compared to native apps2sd method because it moves the dex file as well.

The second advantage of Link2Sd over native apps2sd is that by creating symlinks you get Android assume these apps are installed into the internal memory, though in fact all the files are located on the SD. 
Therefore you can link all applicatios to SD card; widgets, services, live wallpapers etc., all of them will work without any problem from SD card.

The third advantage is that, even when you mount the SD card to your PC your linked apps are all still live and working!
Because Android unmounts the first FAT partition to share files with your computer but the second partition remains mounted. Link2SD allows you to run all of your "SD apps" even when mounted to your computer as a disk drive.

And, disadvantage is that, obviously, it requires root privilige and a second partition on your SD card. 
It's not working "out-of-the-box" as native apps2sd, you need to root your device and create a second partition on your SD card yourself.

Requirements:
-Windows computer
-Rooted SGY
-2nd partition on SD card (see step 1 below)
-Link2sd app (market or APK) *NOTE:market download is preferable because it is more updated*

Step 1:
1. Download minitool partition wizard home edition on your computer HERE
2. Connect your SD to the computer (via card reader or simply usb cable connected to your phone)
3. Make a folder on your computer and back up your entire SD card's main partition to it including hidden files and folders. (Remember if you do this right you won't have to lose your card's contents, unlike the recovery method.) *NOTE:Make sure that Show Hidden Files and Folders is ON so you can see some of the hidden folders present on an android system's SD card*
4. Open minitool partition wizard
5. Look for your SD card along the bottom and identify your FAT32 Partition *NOTE:be careful on choosing drives.you must choose correctly or you may partition your hard drive*

6. Right click on it and choose "Delete" then right click it again and click on "Create"
THEN


7. Change the create as: to Primary and change the File System to: Fat32 Use the down arrow in the middle field "Partition Size:" to change the value and consequently the value of the "Free Space After: field as well until you have created around 1027 MB of free space. *NOTE: DO NOT create free space before the first primary FAT32 partition!!! If you do discard changes and start over!*

8. Click Ok.
9. Identify the new unallocated space on the drive map.

10. Right click on it and choose "Create"

11. When you get the warning about the partition not being able to be used in Windows click "Yes" to continue
12. Choose Ext2, Ext3 or Ext4 for partition type based on whether your kernel supports Ext4. If it does choose it! If you don't know choose Ext2 to be safe. I would avoid Ext3 unless you have to. 2 or 4 are preferred 
*NOTE: You cannot resize an Ext partition after you make it. You can only move it around so choose your size wisely! I find a GB to be plenty and I have 150+ linked apps with 360 MB free on SD card partition 2 but you can have up to 2 GB.*
13. Make sure it is a primary not a logical partition

14. Name it if you want.
15. Click "OK" to continue
16. Click the BIG "Apply" button in the top left of the window (see the lower left side of the window if it is correct)

17. Choose "Yes" to continue from the pop up
18. Let it do it's work
*Step 1 complete*

Step 2: (I don't have screen captures yet :P )
1. Eject and place your SD card back into your phone
2. Boot up your phone
3. Install Link2SD
4. Run it
5. On first run it will ask you the type of partition your second SD card partition is. Choose Ext2 or Ext4 depending on which you made it.
6. Follow the directions to reboot your phone

Congratulations! Link2SD is now working on your phone!

When you click the menu button in Link2SD and choose "Storage Info" you should see three memory spaces. Internal, SD Card, and SD Card 2nd Part.

At this point I recommend you Menu click and go to Settings and choose "Autolink" to automatically link programs (.APK), dalvik cache files (.DEX) and library files (libs) to your SD Card 2'nd partition when a new program is installed.

Troubleshooting:

*If you have issues with your primary SD card partition not working right or perhaps you decided to wipe the whole card and create them both/or all three from scratch, remember that this FAT32 partition 1 has to be set ACTIVE and all partitions have to be primary not logical.

*If you cannot mount Ext2 or Ext4 make the second partition FAT32. It will work for all Wildfire S Models and all ROM's. Try the others first as they are preferred for performance and stability.

*If you don't have a card reader it's been reported that you can use your phone in hard drive mode to achieve the same thing, followed by a reboot but I have heard many cases where this causes troubles so I personally don't recommend it but hey. You gotta do what you gotta do.

*Some users are reporting with MarvelC's that they needed to use Ext3 so I have updated the tutorial to reflect this.

*If you don't immediately see a change in internal memory after linking apps relax. It will show up. Sometimes it just is a little delayed.


If you have questions, ask at our facebook page: http://www.facebook.com/sgalaxyy
Baca Selengkapnya ....
Trik SEO Terbaru support Online Shop Baju Wanita - Original design by Bamz | Copyright of android populer.